


- Home
- >
- Software Development
- >
- Getting Started with GitHub – InApps Technology 2025
Getting Started with GitHub – InApps Technology is an article under the topic Software Development Many of you are most interested in today !! Today, let’s InApps.net learn Getting Started with GitHub – InApps Technology in today’s post !
Key Summary
- GitHub Essentials: A platform for version control and collaboration, serving as a developer’s portfolio for showcasing projects and code.
- Account Setup: Create a free GitHub account with a professional username and configure password caching for easy access.
- Repository Creation: Name your repo (e.g., “studious-octo-carnival”), set it as public or private (paid), and skip initializing with a README for existing projects.
- Git Workflow: Initialize a local project (git init), stage (git add *), commit (git commit -m “First commit”), and push to GitHub (git push -u origin master).
- Practice: Master the create-stage-commit-push cycle to build confidence in GitHub workflows.
- Next Steps: Explore branching, forking, and advanced features for deeper GitHub proficiency.
Read more about Getting Started with GitHub – InApps Technology at Wikipedia
You can find content about Getting Started with GitHub – InApps Technology from the Wikipedia website
Greetings, fellow git venturers, and welcome to part two of our guide to git, the version control software, and GitHub — the git-driven center of the open source universe where millions of developers store their projects.
In part one we discussed git and how to get started using it. Git is a truly remarkable tool: while actually quite complex, beginners can start using git’s most important functions right away without needing to know much at all, beyond the basic operations we introduced last time.
At this point you know the fundamentals of the git-centric workflow and how to conduct basic version control: creating a repository, staging and committing changes. The next step is to deploy your project to GitHub. Git itself is a command-line tool, and lives in your laptop. The center around which all things git — init projects revolve, however, is the literal hub — GitHub.com — where developers upload and store their projects, and where other people can view and contribute to them.
Welcome to GitHub
I will let you in on a dirty little secret of the tech world: many developers are not all that great with GitHub.
-

“Git” via the webcomic xkcd. Used with permission.
This commonly shared shame directly conflicts with another not-so-secret secret: these days, a developer’s true resume is not some piece of paper listing previous experience — it’s your GitHub page. Prospective employers go straight to your page to see the kind of projects you’ve done, your commit histories, and even open up repositories to look at your actual code. It’s kind of like being naked, in a professional sense. (Actually, for a coder, this is exactly like being naked).
Where these two data points intersect: as a developer in the modern web environment, it is imperative to understand the workflow that drives git and GitHub. In other words, how the systems works and why we perform each step of it. Once you’ve internalized that understanding, the how actually becomes pretty easy — self-explanatory, even.
I believe this so firmly that, when I teach front-end web development intro classes, we begin with a thorough grounding in git and GitHub before ever touching a line of HTML, CSS or JavaScript.
First things first
Let’s start by setting up an account on GitHub. It’s simple enough: establish a username and the email you wish to have linked with your GitHub existence. Pro tip 1: take a minute to think about your username. This is going to be inextricably linked with your professional identity forever, so some combination of your first and last name is likely your best bet. (Which can be a small ”that username already exists” error message problem if you have a commonly-occurring set of monikers, but we trust you can figure something out). Pro tip 2: every conceivable username combination of “foo” and “bar” has already been taken.
It is completely free to create and use a GitHub account. Let us all pause for a moment of gratitude that this amazing resource exists in the first place, and that it doesn’t cost individual devs a dime.
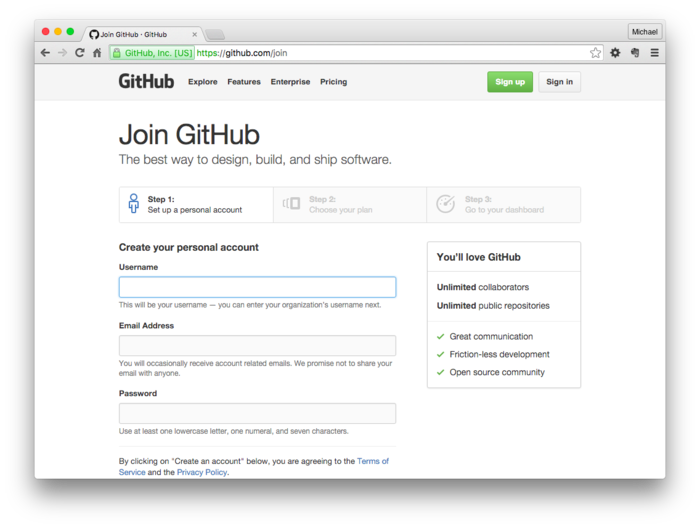
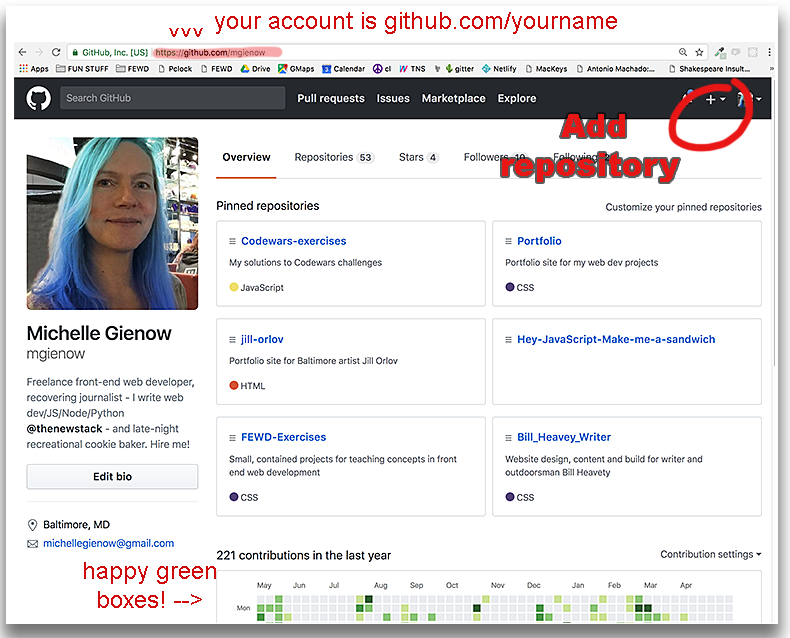
Your GitHub account will now exist as https://github.com/yournamehere
From here on out we are going to be using my own GitHub page as an example. Obviously, as you follow along, change anything that says “mgienow” — my first initial/last name GitHub handle (because “blue-haired JS goddess” seemed too braggy) — to your own GitHub handle.
A final tip: at this point, every time you access GitHub from the command line — to push (upload) or pull (download) project files — it is going to ask for your GitHub password. There is a way to tell git to automatically authenticate with your password so you don’t need to enter it each time. The process varies a great deal depending on your OS, so go to the GitHub password caching guide and follow the instructions tailored to your particular scenario.
Creating Your First Repository
Once your shiny new GitHub account is established, the next step is to create a remote repository. Start by clicking the ‘plus’ symbol in the upper right corner:
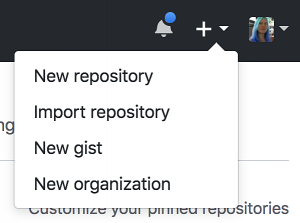
This brings up a popup box; click on “new repository” (and don’t worry about the other options for now). GitHub then generates the page for you to create a new repo. GitHub detects your OS to responsively render its user interface, my screenshots may not match your results exactly if you’re on a different version of MacOS, or Windows or Linux. No worries: the boxes all fill in the same way.
Next, fill in the blanks:
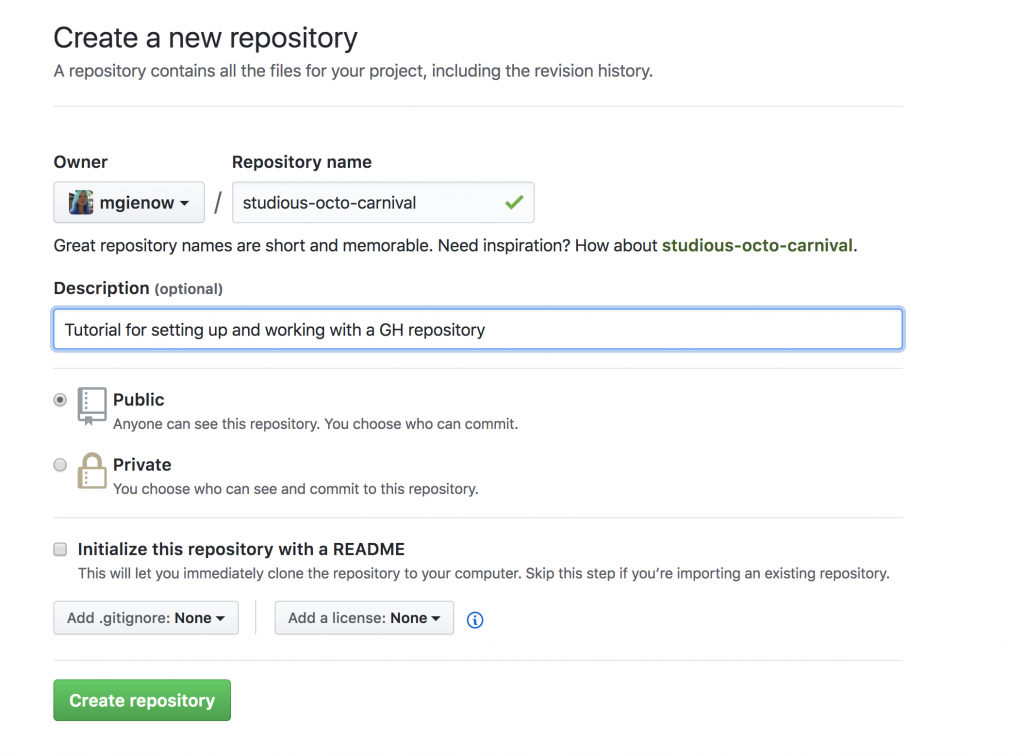
Repository name: Most of the time, when working on an actual real-world project, it makes sense to use a repo name that fits your project. However, GitHub always also suggests a randomly generated repository name that is usually pretty entertaining. Since this is a practice exercise, and since I’ve always wanted to actually use one of rando tags, today’s sample project is henceforth dubbed “studious-octo-carnival.” For our practice exercise today, please name your repository whatever GitHub helpfully suggests will make a good name. From here out, substitute that name for “studious-octo-carnival.”
Description: For today, “Tutorial for setting up and working with a GitHub repository.” Next time, once the training wheels are off, type whatever it is your actual project does.
Public vs Private: “Public” is the only option for a free GitHub account. Anyone with your GitHub address will be able to view whatever you upload — that’s why this is open source. If you need your privacy, paid GitHub accounts allow you to make private repositories as well. The current price is $7/per month for an individual developer plan.
Initialize: The “initialize” step is up to you. In our first git tutorial, we created a local README file as part of our project. Since we are going to be pushing a project up to GitHub, we do not want to create a new README.
At this stage of the game, we don’t need to worry about “.gitignore” — though that will come in handy eventually, it’s beyond our current scope in terms of both need and ability — and same with licensing.
Prepping your Project to Go Upstairs to GitHub
Most beginners start by creating a project on their own computer and then uploading the whole enchilada to GitHub. You can also start by creating the GitHub repository first, pulling it down to your computer, and backfilling with content. It’s the same result either way, but the “first creation, then publication” model is the one most people naturally follow so that is what we are doing here.
Let’s step through the entire process with a new example project since it’s important to internalize the git — and GitHub — workflow.
- Referring back to the first tutorial, use the command line to create a project directory (folder) named “studious-octo-carnival” (remember: subbing in whatever random name GitHub suggested when you created your own repository in our previous step).
- CD into the new directory (<- this is important, and a step beginners often forget!) and create three new empty files, replicating a basic web page project structure: README.md, index.html, styles.css.
- Initialize the directory as a local git repository with “git init”
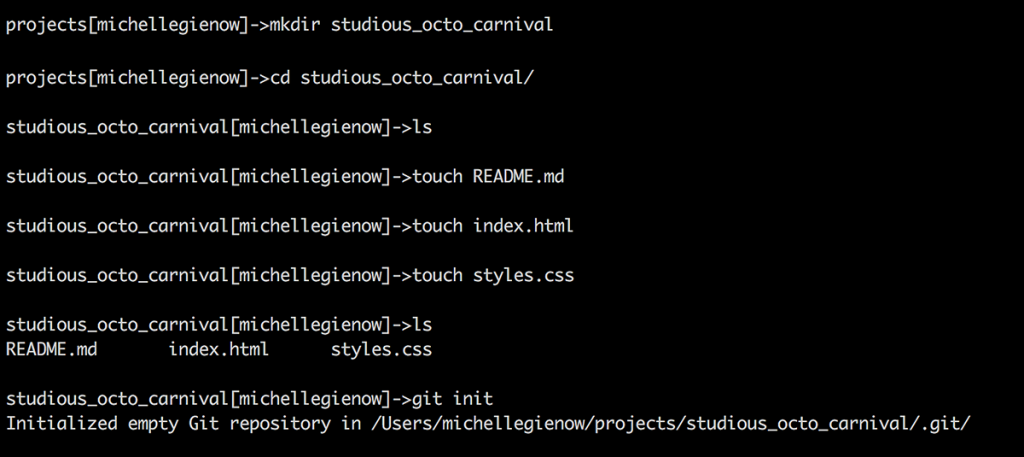
So, workflow-wise, what we have done here is created a project folder, places several files in it, and then “turned on” version control using git-init.
Our next steps also come from the previous tutorial: staging the files and then committing them. Remember that this is the same thing as taking a snapshot of your entire project as it is right now, and giving it a caption (the commit message) describing what you’ve done. The first commit is almost always called “initial commit” or “first commit.”
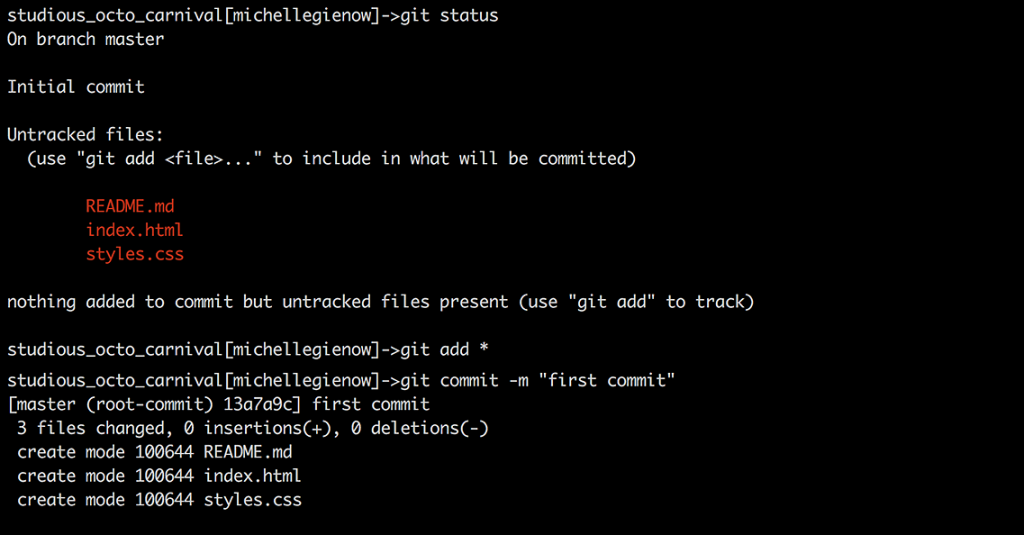
- Stage the project: “git add *” takes a snapshot of your project directory and everything in it exactly how it is at this time.
- Commit the project: “git commit -m “First commit”” tells git to save this “snapshot” and the commit message as caption information.
Linking Your Git with Your GitHub
This is the magic moment: we are going to connect what you made locally with your GitHub repository. From now on you will be able to move content back and forth to your heart’s, well, content!
Back to GitHub now. When we initialized the new repo, we got a screen that looked like this:
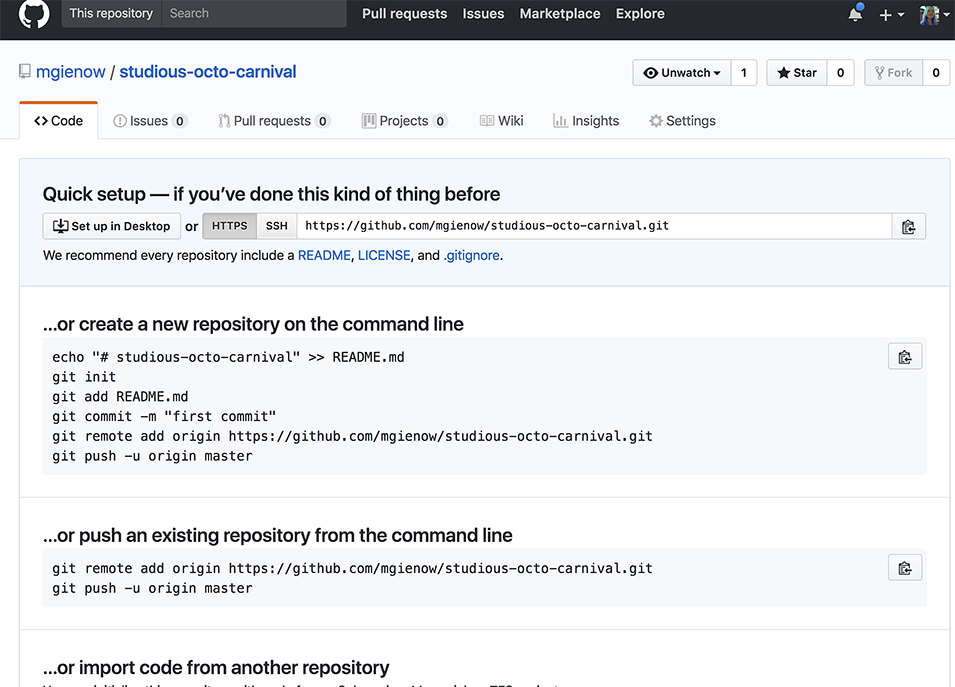
We are going to push our existing, just-created repository from the command line. The easiest way to do this is to simply click the clipboard icon on the right (in the second box, “…or, upload a new repository from the command line”) and then paste that into terminal. However, I highly recommend typing everything in for now — it builds those git muscle memories, and also helps us keep track of what we are doing and why.
- Add the remote: “Git remote add origin https://github.com/mgienow/studious-octo-carnival.git” tells git on your machine to add this link to your project. Let’s break down the link: GitHub.com is the host, and you’re putting it in your personal GitHub account so next comes your GitHub handle. Finally, the name of your project with a “.git” extension because it’s now a git file — an envelope holding everything packed inside your project, created back when you did “git init”. Don’t worry if you don’t see it — you don’t need to, and git’s got your back.
- Now push! “git push -u origin master” is the command to actually send your project to the remote.
-
- “Push” is the git term for uploading it.
- “-u” means upstream: your project is flowing upward to the host repository.
- “Origin” refers to where it is coming from: your project on your computer
- “Master” refers to the master copy now live in your GitHub repo online.

THE MAGIC HAS HAPPENED!!!!
How can you tell? Well, first, there’s no error message. ???
Second, you can check by typing “git status”. When you see the beautiful words, “On branch Master. Your branch is up to date with ‘origin/master.’ Nothing to commit, working tree clean” that means you are home free.

CLEAN, baby! Whoo. I still get a little bit of a rush every time I successfully push code to GitHub.
But the true evidence of victory lies on your GitHub account: the repository now shows up on your GitHub Repositories page. Notice the tabs on the top line next to your avatar image: Overview is your homepage, Repositories is where all your repos are listed in chronological order of most recently added/worked on.
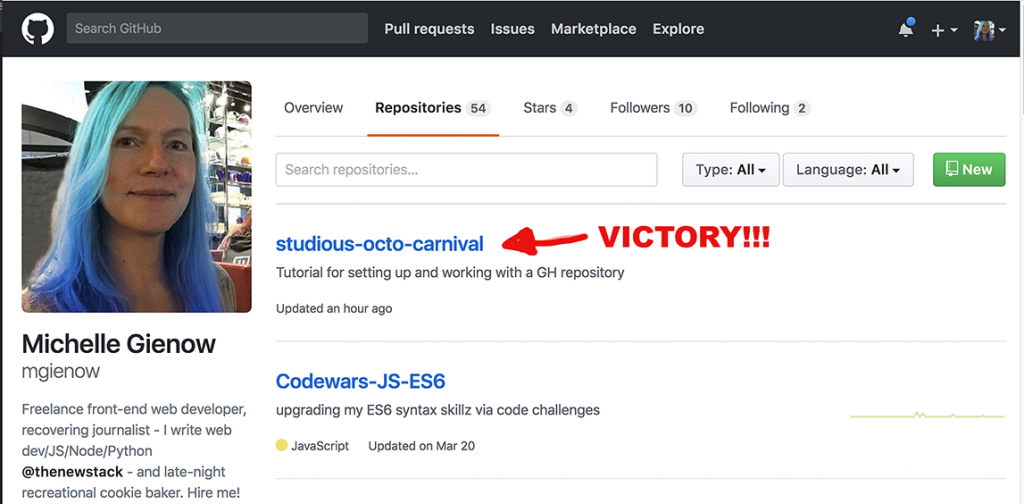
You can click on the repo title to go to its project page:
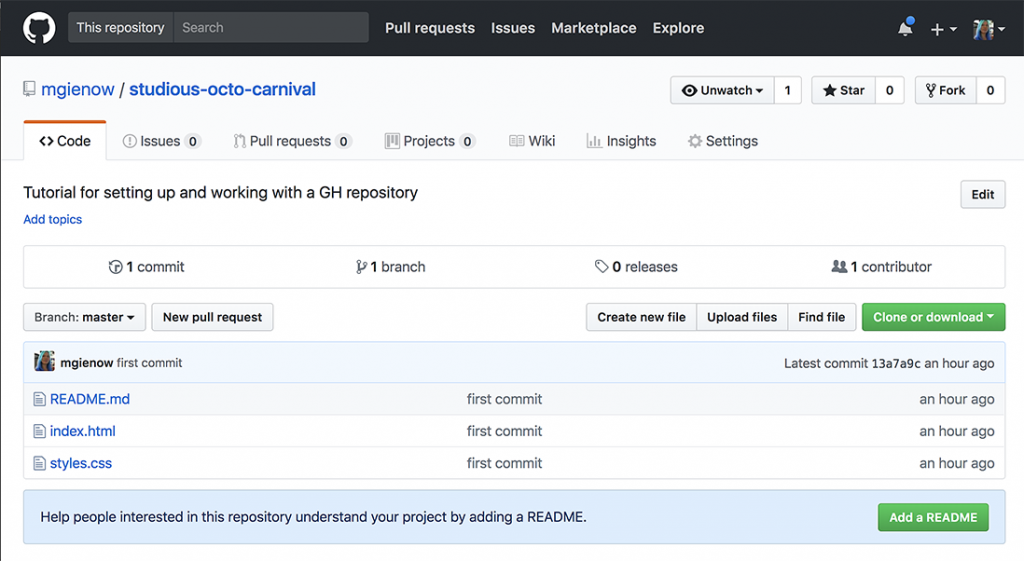
W00T, there it is!
Summary of Today’s Awesome Achievements
- We created a GitHub account and thus made a giant leap into establishing an identity as a professional developer.
- We created a new project repository on GitHub.
- We created a sample project on our computer, initialized it as a git entity, staged and committed it, and pushed it to GitHub.

Feel good? Great. Now go do it five more times. I’m serious: this is the heart of git workflow. Create -> stage -> commit -> push. You need to be absolutely comfortable with all these steps before moving on to any other GitHub endeavors. We will be back next week to talk about why origin is called origin, why master is called master, what truly lies upstream, branching, forking…all the mysteries of git revealed. Now shoo and go do your homework. Seriously. Make some new files in our sample project and push those. Then start a second sample project and practice making a new repo for it before pushing your first commit. Git going. Git good.
Source: InApps.net
List of Keywords users find our article on Google:
| github |
| github readme |
| tool-x github |
| telegram github |
| github tree |
| github username |
| https://github.com/ |
| github pro |
| guthub |
| how to add github to linkedin |
| github whatsapp |
| github gitignore |
| whatsapp github |
| custom application development |
| github error |
| github status |
| final year projects github |
| github achievements |
| revolve group wikipedia |
| whatsapp web to go github |
| github whatsapp web |
| portfolio on github |
| github handle |
| github keywords |
| forever github |
| git hub |
| github source |
| elementor github |
| github app |
| github templates |
| get hub |
| githb |
| github client |
| add license to github repo |
| github remote jobs |
| github resume template |
| github/gitignore |
| github personal readme |
| you will own nothing and be happy origin |
| how to add screenshot to readme.md |
| github repo |
| hire git developers |
| github projects for beginners |
| git service status |
| github down twitter |
| git down |
| github down |
| tourism-website project github |
| https://github.com |
| fb github |
| www github com |
| games on github |
| victory github |
| travel website github |
| github games |
| github com |
| the entity true story wikipedia |
| codewars github |
| next github |
| three.js github |
| telling lies game wiki |
| git hub.com |
| the next step wiki |
| games github.io |
| real world github |
| github elementor |
| portfolio website github |
| clean master wikipedia |
| readme github template |
| github next |
| github team |
| github python gitignore |
| github wikipedia |
| github entity framework core |
| next js gitignore |
| github portfolio website |
| github food delivery |
| git hub team |
| githun |
| github readme awesome |
| github status twitter |
| id software github |
| magic leap wikipedia |
| portfolio in github |
| githut |
| next js github |
| telegram x github |
| girhub |
| githu b |
| github exercises |
| paper github |
| git naked |
| githib |
| github next js |
| gtihub |
| host shiny app on github |
| xkcd git |
| github page portfolio |
| github wiki |
| add license to github |
| git github com |
| github for game development |
| how to upload file on github |
| github practice exercises |
| open hub github |
| what license to use github |
| github pages md |
| how to send message on github |
| calendar javascript github |
| github licensing |
| top secret folder template |
| github project |
| github upload image |
| go projects github |
| octo github |
| total js github |
| which license to use github |
| awesome github |
| github got |
| github license template |
| upload files to github |
| “beyond words typing service” |
| how to connect facebook leads to github |
| www octo clicks co id |
| github admin |
| github calendar |
| github avatar |
| grounding wiki |
| hire remote github developers |
| last name bui origin |
| github readme template |
| readme github |
| cheap git hosting |
| github issue template |
| github project templates |
| awesome projects github |
| github javascript projects |
| github license for private project |
| github portfolio |
| how to download whole folder from github |
| python projects for beginners github |
| simplyclick master |
| github change password |
| github readme local image |
| github view history |
| github game off |
Let’s create the next big thing together!
Coming together is a beginning. Keeping together is progress. Working together is success.


