- Home
- >
- Software Development
- >
- Git for Absolutely Everyone – InApps Technology 2022
Git for Absolutely Everyone – InApps Technology is an article under the topic Software Development Many of you are most interested in today !! Today, let’s InApps.net learn Git for Absolutely Everyone – InApps Technology in today’s post !
Read more about Git for Absolutely Everyone – InApps Technology at Wikipedia
You can find content about Git for Absolutely Everyone – InApps Technology from the Wikipedia website
There is a fairly universal stereotype about programmers: we are reclusive introverts wanting to interface solely with our multiple computer monitors, preferably in a darkened room. We leave our battle station/fortress of solitude/code dojo only when driven forth by a biological need to eat, sleep or use the bathroom. We never speak to others unless (a) absolutely necessary or (b) as our online RPG avatar self (irresistibly well-endowed high-level mage/warrior). As with all stereotypes, this is somewhat rooted in reality. As programmers, our passions drive us to interact with machines more, and perhaps more able, than with other humans.
However, life as a software developer is much more social and collaborative than the stereotypes would have non-coders believe — at times, even frustratingly so. Thankfully, there is git: version control software to bring collaboration with project team members right back where it belongs: on the command line.
This “Git for Dummies”-styled tutorial is for non-programmer people who need to be able to collaborate and communicate effectively, with coders. We will start with the super basics of what git even is, why we use it, and how to get started. By the end of this tutorial, you should be able to approach a coder in their natural habitat!
What Is Git?
Git is version-control software for working on group project collaboration. Not collaboration as in group dynamics and fair distribution of project workloads and who ate the last jelly doughnut, but in the actual mechanics of sharing work back and forth. When a week’s worth of shared project progress gets accidentally deleted or overwritten, or hours of work get eaten by a faulty file transfer, things can get, well, angry.
Just as Google Drive makes it possible for multiple contributors to write, edit and add to the contents of a single text file, git is a computer program making it possible for multiple coders (and project managers, testers, content providers, and whomever else is on the team) to collaborate on a single project.
Learning git can be intimidating if you yourself have little or no programming experience, but just keep thinking of it as a funny-looking Google Docs and you’ll do fine! Fun fact: git was invented by Linus Torvalds — the same Linus who created the Linux open-source operating system which now runs vast swaths of the internet, including Google and Facebook.
So: git is a piece of software that you install on your computer, which then handles version control for you. What, then, is version control?
What Is Version Control?
Imagine you have a brand new project. Naturally, you plan to store all related files in a single new directory. As work progresses, these files will change. A lot. Things will get disorganized, even messy, and at some point even completely fubar. At that point, you would want to go back in time to the most recent not-messy, still-working version of your project — if only that were possible!
Well, thanks to git, it is. Version control happens when you install git on your computer. Git is built to create that new project directory, and to keep track of all the changes you make to any and all files you put in that directory. As things progress and you make additions and changes, git takes a “snapshot” of the current version. And that, friends, is version control: make a small change, take a snapshot, make another small change, take a snapshot…And save all of these snapshots in chronological order. You can then use git to step back and forth as necessary through each version of your project directory.
So when you screw up, git is like having this magic ability to go back in time to the last good version before you gaffed. Thus, version control. git is not the only version control systems out there, but it is probably the most widely used. It is also essential for using GitHub, which is the most popular public website and platform for hosting and sharing projects. It’s not the same as git — it’s a hub for projects that use git version control.
We will discuss GitHub here only briefly because first it’s important to understand what git itself does. Using GitHub itself, however, is a whole other learning curve, which we will learn in our next tutorial.
Collaborating with Git
Easy enough to understand as one person working solo on one project. But envision working with a whole team of people where you all need to share the same project directory. You will make changes to your part of the project — while working locally on your laptop — and your collaborators will be doing the same on their portions of the project on their own machines. How do you share changes to your collaborators, and also have the changes they make appear in your own local working version? How do you make sure something you are working on doesn’t conflict or crash things other people are working on?
Git is a distributed version control system. This means that git has commands that allow you to “push” your changes to other people’s machines, and “pull” their changes to yours. Meanwhile, GitHub holds onto a master version — actually, a master library of all the versions, ever — of the project to keep things from getting too wild and crazy.
It also allows everyone to push and pull changes from a central repository, so in case one of your coworkers is out sick for a week things don’t get hung up when you can’t access their portion of the project because their laptop is home with them in Flu Central. Again, more about this next time in “Getting Started with GitHub.”
Getting git
Step 1. Download git
Choose the right one for your own preferred operating system: Mac OS, Linux or Windows. It will self-install. Don’t worry if it looks like nothing’s happening,
Step 2. Open Terminal
I’m sorry but you’re just going to have to use the command line. So, shut up and shell: Linux users, you already know what to do. For Mac users, it’s Finder -> Applications -> Utilities -> Terminal. Windows users (why are you even here?), you’re going to have to download and install a terminal emulator.
If this step has you frozen in terror because you have absolutely no idea what to do now, or how to do it, go directly to the amazing Command Line Crash Course and work through that (takes a couple hours and will leave you feeling like a code commando, I promise!).
Step 3. Tell git you exist
Now it is time to configure your name and email. Do this by typing in the following, of course replacing the values with your own name and email.
git config —global user.name ‘My_Name’ git config —global color.ui ‘auto’ |
That last line is optional; it tells git to automatically make any output of git commands in the terminal nicely color coded, which is much easier to read and also to understand. The reason we put “–global” in front of each is to avoid typing these config commands the next time we start a git project on our system. So this way, git knows who you are — forever.
Step 4. Create a new directory
Now it’s time to practice setting up a sample project. Set yourself up an empty directory to hold all your glorious, soon-to-exist project files (hint: $mkdir (yourDirectoryNameHere). Then CD into it and type the magic words “git init”:
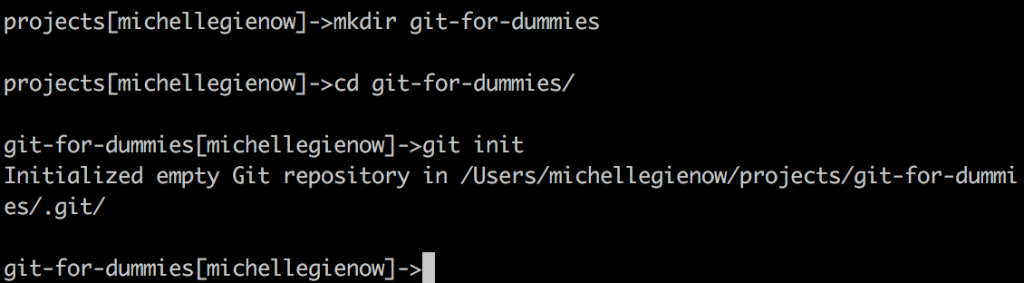
“Git init” creates a new git Repository, usually called a “repo.” Envision it as your project’s folder, only now with git superpowers. A repository contains all of your project files as well as extra, mostly invisible stuff that git generates to track and store each file’s revision history.
Get Into the Git Workflow
At this point you have created a repository on your own computer. The extra stuff git put in there consists of three separate “trees” — don’t worry, these are entirely managed and maintained by git. The main area you engage with is the Working Directory, which contains your actual project files. There is also the Index, a kind of temporary holding area for your newest changes and additions. And the Head which points to the last Commit — the most recent saved version.
Pro tip: every time you type a git command into the terminal, it must begin with “git”: the format is generally “git do whatever.” This tells your computer that you specifically want to activate git, as opposed to other terminal options that are available.
Step 5. Add a “README” file and project files
It’s an excellent idea to start by creating a “README” file to explain what your project is, what might be found within, etc. (A project README doesn’t need to be encyclopedic — just the basic facts, ma’am. It doesn’t get written at this time, either — we are just setting up the directory right now). This, by the way, is a basic command line endeavor, not git specific: “touch README.md”:
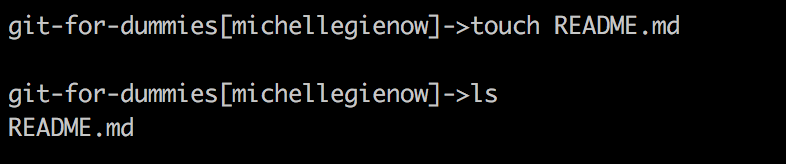
Since you are the one who knows your project parameters, you’re in charge of adding the actual project files. Just repeat the process above using the appropriate file names.
Step 6. Copy your repository
In this step we create a working copy of your local repository — your current project — so you can mess around in it without consequences.
It is crucial to work from a copy, particularly in a group collaboration! If your work goes well, you save everything as you go (that will be our next step). Ultimately, all the changes/additions you just made get added back to the original repository, and that becomes the current version. Meanwhile, other people are doing the same thing in their own copied versions, which quickly become different from your copied version.
The beauty of git is that it keeps track of all this stuff for you — who has changed what where — and orchestrates it all.
So copy — or clone, in git-speak — your repo by running the command “$git clone /path/to/your_repository:”
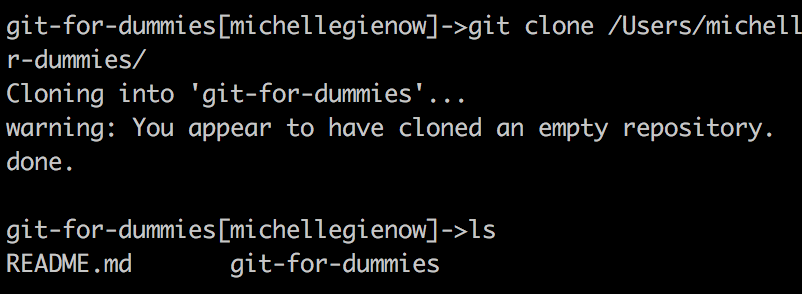
(If you are starting by copying a file somebody else has already started, taking it from whatever remote/server, your command will be “$git clone [email protected]:/path/to/repository”).
Notice how inside our original git-for-dummies directory we now have a new, copy directory of git-for-dummies (next to our README). The reason it’s telling us we appear to have copied an empty repository is because we have not yet saved our new additions (staged our commits).
Step 7. Check status
(BTW behind the scenes I added a placeholder file called “my_file.md” so we have something in our repo besides the readme). Now that we have some files in our repository, let us see how git treats them. To check the current status of your repository, type “git status”:
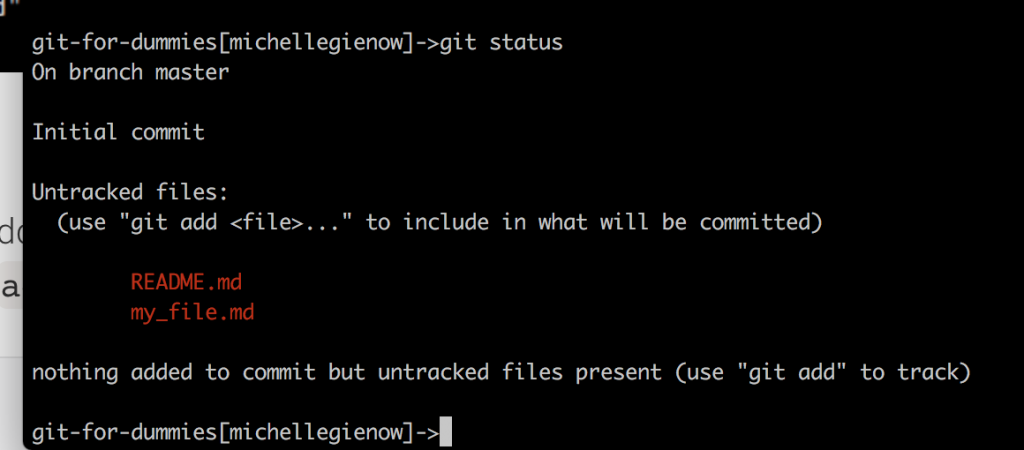
Step 8. Tell git to add your changes
Git status is telling us that we have new files that have not been officially added to the git tracking process. To tell git that, yes, please be the sweet sweet concierge of these files, we add them to git. Confusingly, this is called “staging” them when the command is actually “git add (file name here)”:
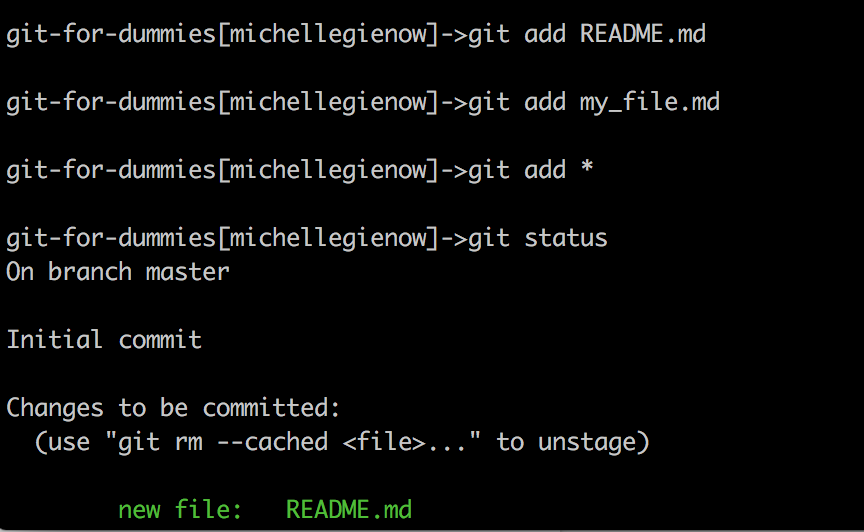
Notice how the text color has changed from red to green: you have made git happy! Once you have staged your files, using “git add,” you can commit them into git.
Step 9 git commit!
Again, imagine each commit as a snapshot of a point in time where you can return, if necessary, to access your repository in its earlier state.
To identify each of these snapshots, you provide a commit message. This is a brief statement of what exactly happened in between the last version and this, the latest and greatest. Provide a useful commit message because it helps you in identifying what you changed in that commit — this is the only place where viewers can see not just what has changed, but why. So it’s worth putting a bit of thought into each commit message — try thinking about what future you would want to know about the stuff you just added or changed. This is a terrific article about writing useful commit messages; read it, do the things, and future you will thank you.
That said, your very first commit message when establishing a new repository is always “Initial commit.” A commit message is formatted “$git commit -m”my commit message”:
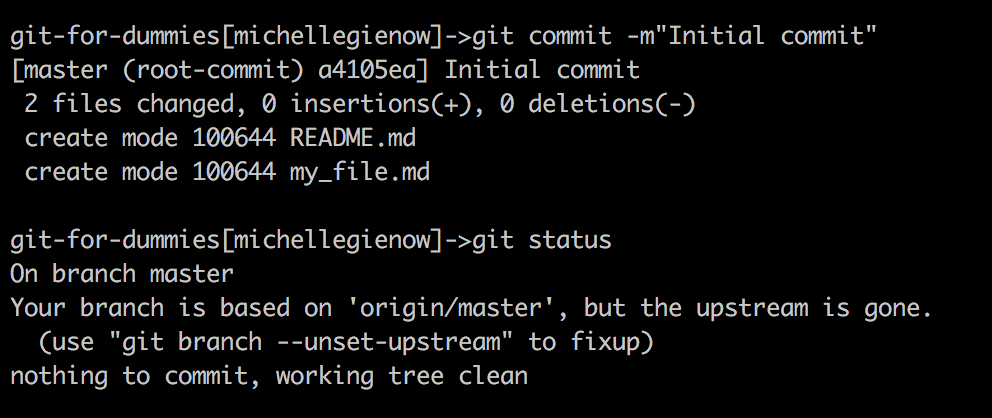
Git identifies each unique commit by attaching a long hexadecimal number to every commit. In the screenshot, notice that “a4105ea” our first commit. This is like the caption on your snapshot. Should we need to go back in time and access this particular version of our project, this is the “name” you would use to identify the version you want.
Step 10. There is no Step 10 because YOU DID IT!!!! ???
Notice how in the screenshot above, following the commit we did a “git status”. git returned the lovely message “Nothing to commit, working tree clean” (remember our trees? If not, go back and re-read the git Workflow section, above). This means you are all caught up and current. That git has captured and saved a snapshot of your project. Though this early on, it’s kind of like a baby picture.
However, as your project changes and grows, you will be capturing loads of snapshots to document the journey. Meaning: commit often. So you can literally turn back time to your project’s earlier, more innocent days… ah, if only there were a human version…
Ahem. Ok, yeah, so, Git’s got your back…at least on your own computer right now.
Next time: we take our repo on the road and learn how to put it up on GitHub so others can play, too!
Feature image via Pixabay.
Source: InApps.net

Let’s create the next big thing together!
Coming together is a beginning. Keeping together is progress. Working together is success.