


- Home
- >
- Software Development
- >
- Get Started with Google Cloud AutoML Vision for Image Classification – InApps Technology 2022
Get Started with Google Cloud AutoML Vision for Image Classification – InApps Technology is an article under the topic Software Development Many of you are most interested in today !! Today, let’s InApps.net learn Get Started with Google Cloud AutoML Vision for Image Classification – InApps Technology in today’s post !
Read more about Get Started with Google Cloud AutoML Vision for Image Classification – InApps Technology at Wikipedia
You can find content about Get Started with Google Cloud AutoML Vision for Image Classification – InApps Technology from the Wikipedia website
Recently, at the Cloud NEXT 2018 conference, Google made AutoML available to the public, in Beta. The service dramatically reduces the steps involved in training and tuning a machine learning model. AutoML on Google Cloud is available for translation, natural language, and vision.
In this tutorial, we will use AutoML Vision to solve an image classification problem. We will train the model to classify an image of a dog based on its breed.
You don’t need to be a Python or a TensorFlow developer to follow this guide. Towards the end, we will write a few lines of code to perform inferencing on the fully-trained model hosted on Google Cloud Platform. Before proceeding further, make sure you have the below prerequisites met.
Prerequisites
- Active subscription with Google Cloud Platform
- Google Cloud SDK
- Python
Setting up the environment
On the development machine, start by setting the following environment variables. Replace <project-id> with your active Google Cloud project. Don’t change the second variable as AutoML Vision can run only in US Central region while in beta.
<em>export PROJECT_ID=“<project-id>”</em><em>export REGION_NAME=“us-central1”</em> |
We need to enable the AutoML APIs to invoke from code, enabling Google Cloud Storage, Cloud AutoML API, Google Cloud Storage JSON API for your project.
To invoke the model, we need to associate our application with a set of credentials. Visit the Service Account to create a service and the corresponding key file in JSON format.

For the project role, select AutoML Predictor. The downloaded JSON file will have just enough privileges to invoke the API for inferencing. Create another environment variable that points to the downloaded JSON key.
<em>export GOOGLE_APPLICATION_CREDENTIALS=key–file</em> |
We also need to create a Google Cloud Storage (GCS) bucket to store the image dataset. Run the below commands to configure the bucket. Ensure that the bucket name is $PROJECT_ID-vcm. This is a mandatory requirement for the beta release.
<em>gsutil mb –p $PROJECT_ID –c regional –l $REGION_NAME gs://$PROJECT_ID-vcm/</em> |
Finally, let’s install the Python module for Cloud AutoML. Run the below command to install it on your workstation.
<em>pip install google–cloud–automl</em> |
Data preparation
We are going to use the popular Stanford Dogs Dataset to train our model. Download and extract the Images tar file, which is about 757MB in size.
For this tutorial, we will only use dog images belonging to three breeds – Beagle, Chihuahua, and Doberman. Let’s separate them out into a different directory. You may also want to rename the files. Your final directory structure should like the one below:
<em>.</em>
<em>└── data</em> <em> ├── Beagle</em> <em> ├── Chihuahua</em> <em> └── Doberman</em> |
AutoML Vision needs at least 100 images for each label. The dogs dataset comes with about 150 images for each breed, which is good enough for this tutorial.
Training the Model
With everything in place, let’s get started with the training process. This step is comparable to compiling code before running it.
Open the AutoML Vision Console, and click on New Dataset.
Give the model a name and then click on the Import images later option. This will enable us to upload the images after creating the labels.
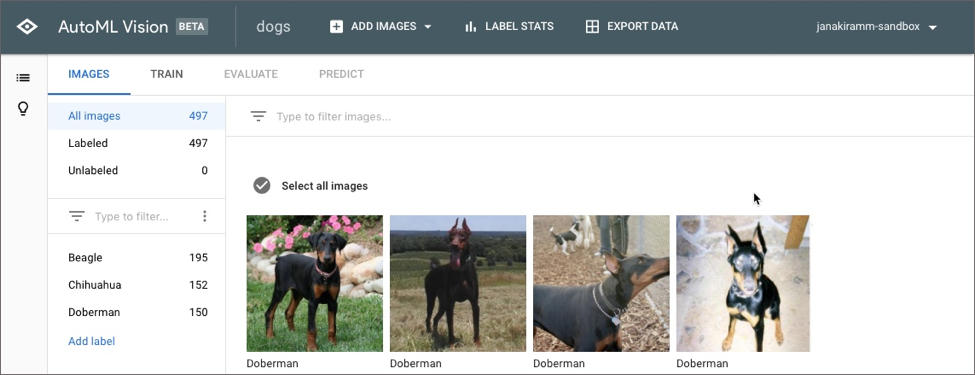
In the next step, click on New Label to add Beagle. Select the newly created label and click on Add Images button at the top to choose Upload from your computer option. Select all the images from the beagle folder to upload it to the bucket. Depending on your bandwidth, uploading may take a few minutes.
Repeat the steps for remaining labels — Chihuahua and Doberman. The uploaded images are labeled and stored in a Google Cloud Storage (GCS) bucket. By the end of this step, your dataset should look like the screenshot below:
Now, it’s time to train the model. Simply click on the Train tab and then click on Start Training. You may want to change the model name to make it meaningful and versioned.

The training job may take a few minutes after which we will be able to test the model for accuracy. Once it is done, click on the Evaluate tab to explore the details.

Since we used a limited number of images, the precision and recall are almost 100%. You can drag the score threshold slider to adjust the precision-recall tradeoff.
To perform predictions, click the Predict tab and then grab a dog image from the Internet (this should be an image outside of the dataset) to upload it. Our model should be able to classify the dog based on its breed.


Congratulations! You have successfully trained the model. The above screenshots confirm that the model is working.
Using the Model for Inferencing
With the fully trained model in place, we can start using it in our code for inference. Cloud AutoML exposes a REST endpoint that be easily accessed from cURL. Since there are multiple client libraries that make the job simple, let’s write a few lines of Python code for inference.
1 2 3 4 5 6 7 8 9 10 11 12 13 14 15 16 17 18 19 20 21 | <em>import sys</em><em> </em>
<em>from google.cloud import automl_v1beta1</em> <em>from google.cloud.automl_v1beta1.proto import service_pb2</em>
<em>def get_prediction(content, project_id, model_id):</em> <em> prediction_client = automl_v1beta1.PredictionServiceClient()</em> <em> name = ‘projects/{}/locations/us-central1/models/{}’.format(project_id, model_id)</em> <em> payload = {‘image’: {‘image_bytes’: content }}</em> <em> params = {}</em> <em> request = prediction_client.predict(name, payload, params)</em> <em> return request # waits till request is returned</em>
<em>if __name__ == ‘__main__’:</em> <em> file_path = sys.argv[1]</em> <em> project_id = sys.argv[2]</em> <em> model_id = sys.argv[3]</em> <em> </em><em> with open(file_path, ‘rb’) as ff:</em> <em> content = ff.read()</em> <em> print (get_prediction(content, project_id, model_id))</em> |
Save the above code as dogs.py.
Before executing the code, grab the ID of the model that we just trained. You can access it from the Models tab.

Run the code by passing the model id and a sample image. Make sure that the GOOGLE_APPLICATION_CREDENTIALS environment variable is pointing to the absolute path of the JSON key file.
<em>export GOOGLE_APPLICATION_CREDENTIALS=key–file</em>
<em>python dogs.py </em> <em> dog2.jpg </em> <em> janakiramm–sandbox </em> <em> ICN8774169915119215250</em> |
Depending on the breed of the dog, the output will show the output from the classification.

Google is not the only provider of AutoML. Microsoft has custom cognitive APIs that can generate the models based on custom datasets. In the next part of this tutorial, we will explore CustomVision.ai from Microsoft to build an AutoML model.
Google and Microsoft are sponsors of InApps Technology.
Feature image of dogs via Pixabay
Source: InApps.net

Let’s create the next big thing together!
Coming together is a beginning. Keeping together is progress. Working together is success.


