


- Home
- >
- Software Development
- >
- Make a GitOps Workflow Using InfluxDB Templates – InApps Technology 2022
Make a GitOps Workflow Using InfluxDB Templates – InApps Technology is an article under the topic Software Development Many of you are most interested in today !! Today, let’s InApps.net learn Make a GitOps Workflow Using InfluxDB Templates – InApps Technology in today’s post !
Read more about Make a GitOps Workflow Using InfluxDB Templates – InApps Technology at Wikipedia
You can find content about Make a GitOps Workflow Using InfluxDB Templates – InApps Technology from the Wikipedia website
InfluxData sponsored this post.

Russ Savage
Russ is Director of Product Management at InfluxData. He has a background in computer engineering and has been focused on various aspects of enterprise data for the past 10 years. Russ has previously worked at Cask Data, Elastic, Box, and Amazon.
Since the rise of Kubernetes, GitOps workflows have become the standard way for teams to manage the state of large systems. GitOps is a way to perform application management and delivery, which at its core leverages a version control system to maintain the desired state of the system. Being able to describe the desired state using human readable text files, and allowing automation to handle deployments and updates based on those files, means less opportunity for human error and faster deployments.
Here at InfluxData, we use the InfluxDB platform to monitor our internal services. We need to be able to quickly manage and deploy changes to that environment. GitOps workflows make perfect sense here and so our engineering teams have built a ton of power into the platform to enable this pattern. This is the same technology that powers InfluxDB Templates.
In this blog post, I’m going to walk you through setting up a GitHub repository to serve as the version control system for your InfluxDB Cloud. We will create automation to enable your team to check out a repository from GitHub, install and configure a local InfluxDB OSS instance to mimic production, make changes and push those changes to the repository, and deploy those changes automatically to your production InfluxDB Cloud account using GitHub Actions.
All the code for setting this workflow up is available in my influxdb-assets git repository. You can also see an example of how to configure a GitHub action to automatically deploy this to your InfluxDB Cloud instance. If you’re new to InfluxDB, you can create an InfluxDB Cloud account for free in just a few seconds.
Before we get into the details of how to implement this workflow, let’s review some of the different technologies that power this experience.
How to Use Influx CLI Configuration Profiles
Anyone doing automation against InfluxDB should start with the Influx command line (CLI) client. It comes bundled with the latest InfluxDB OSS Beta, or you can download it as a standalone binary from our downloads page. Since developers likely leverage different environments — such as development, staging, or production — when they are building, the CLI has the ability to store multiple connection profiles to make working across those environments easy. To see your connection profiles, you can type:
… and you’ll see the output similar to what’s below:

If you’re just getting started with InfluxDB, you’ll probably only see one configuration profile — but you get the idea.
We are going to leverage that capability in a few ways to make our deployment automation much easier to manage. When you first start up a local InfluxDB OSS instance, you need to go through a bootstrapping process to create your first user, organization, and bucket. To help with automation, this process can be done non-interactively (–force, -f) through the CLI, which also creates a “default” configuration profile. Here’s an example of the command to set up your local instance:
|
influx setup –f –b telegraf –o influxdata –u admin –p any–password |

I’m clearly not winning any awards for security with my choice of password here, but this is just for my local development instance on my machine. You’ll want to use something a little stronger if you’re in a shared environment.
You can also see the current configuration profile by running influx config, or list all profiles with the influx config ls command. Notice that the profile is marked with an asterisk in the “Active” column, which means all the commands you send through the CLI will use that profile.

We can define profiles for each stage in our DevOps pipeline — such as dev, staging, or production — and use the same commands against each one. You can have as many profiles as you need and switch between them by setting them as active like this:
|
influx config set –n prod –a |
Also, we recently added the ability to send a specific profile to use on the command-line with the -c, --active-config option. This is really convenient for piping commands together, or ensuring a specific command is run with a specific configuration. We are going to use the pattern of setting an active configuration profile to use for all commands in this post.
Now that we can work seamlessly across different instances, let’s take a look at a way to manage state and different assets using the same tool.
How to Use InfluxDB Stacks, the InfluxDB Template Manager
InfluxDB Stacks are an artifact for managing InfluxDB templates that let you add, update, and remove resources over time. A stack is created automatically when you install a Template, but they can also be initialized beforehand, which is what we will do in this post. Stacks are useful because instead of duplicating the resource, they update them with changes each time you run the influx apply command with the corresponding identifier. A Stack can manage resources defined in a file, a url, a data stream, or a combination of all three. This should be pretty familiar to anyone who has worked with Kubernetes and kubectl before.
Hopefully, these pieces are starting to come together in your mind of how they can be leveraged to create a GitOps workflow. In your production environment, each set of resources (dashboard, task, bucket, etc.) is tied to a stack that can be updated as changes are applied. Depending on the config profile you select, those changes are sent to either your local development environment or your production instance. You can use a set of scripts to deploy locally, or the continuous integration tooling (GitHub Actions in this case) can use the same scripts to deploy your changes to production.
The standard way to work with stacks is to first initialize them using the influx stacks init -n my_stack command. Providing a name allows you to easily reference it later without having to rely on hardcoding IDs into your scripts (a definite anti-pattern for this type of workflow).

You can use the --json flag to output the results in a JSON format, which can then be used with tools like jq to grab information such as IDs (there are examples on how to do that a little later in this post).
Once you have initialized your stack, you can add files, URLs, or individual resources to it. They will then become managed by the stack. That means any changes you make to those files will be deployed the next time you run influx apply --stack-id <my-stack-id>, including deleting a resource.
That’s pretty much all we need to know in order to start putting together our automated workflow. Let’s git to it!
Putting It all Together with a Little Bash
We start by initializing a new GitHub repository to contain all the automation and assets for your InfluxDB organization. For the purposes of this post, let’s call it my-company/influxdb-assets.
Once that’s created, cloned locally, and you’re in the root of an empty repository, you can start building the script needed to set up a local InfluxDB instance and initialize our first stack. Let’s open a new file named setup.sh in your favorite text editor and start scripting.
Based on what we already know, this script should be pretty straightforward. We are initializing a new instance of InfluxDB, creating a new stack named “monitoring” and then applying it. You’ll notice I’m using the --json flag I mentioned earlier, along with jq to save the newly created stack ID so that I can reference it later. At the end, we check that the response code returned from our influx apply command was successful before exiting.
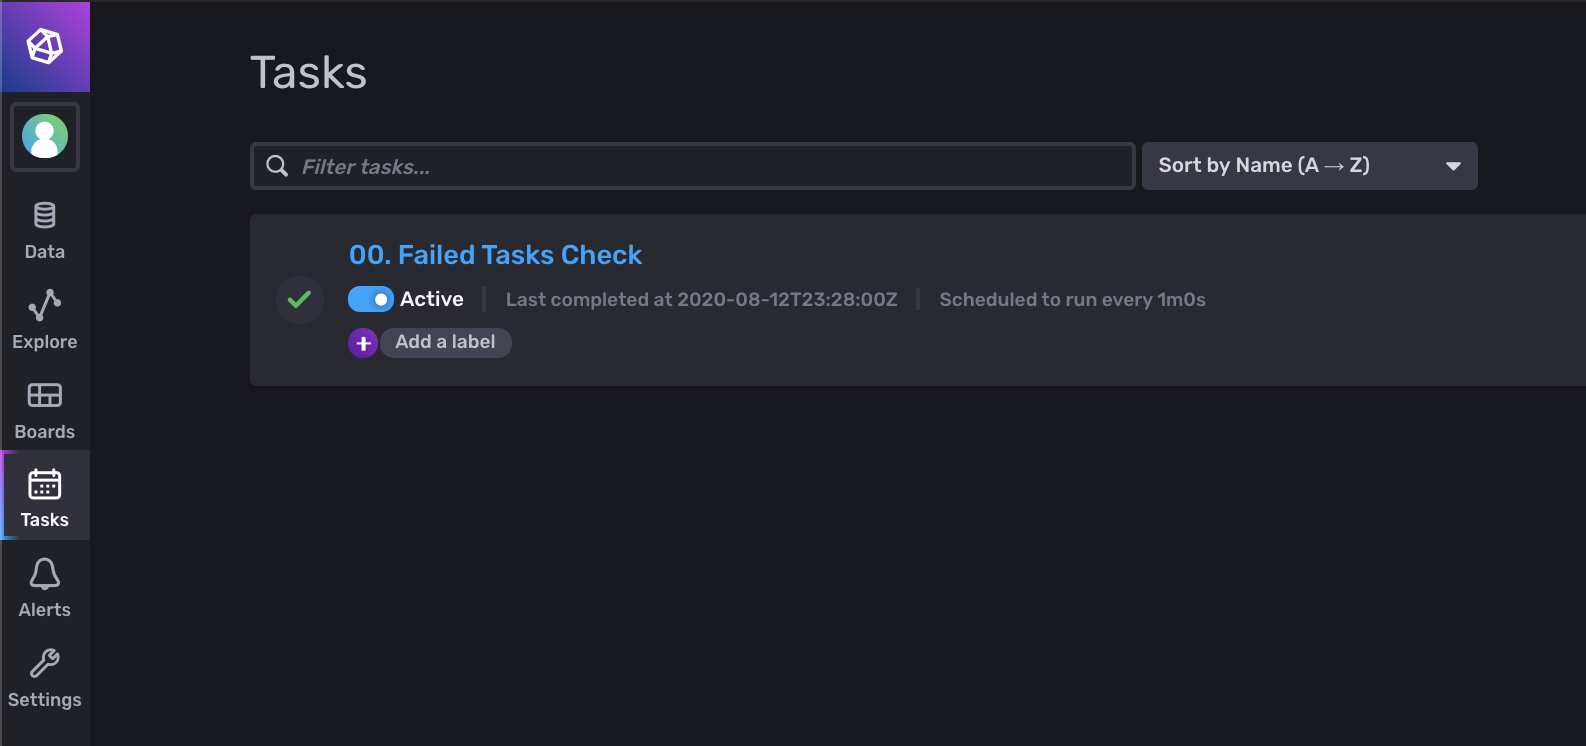
The task itself isn’t too important for this post, but in case you’re wondering, I grabbed this from the downsampling template. It is a custom task that acts as a monitoring check. It will check for failed tasks in your system and write that information to the _monitoring bucket so that it can be picked up by any notification rules you might have set up. Feel free to use any task you’d like for this.
If you change that script to be executable and run it with an empty InfluxDB running locally, you should be able to login to your local instance (probably http://localhost:9999 for InfluxDB 2.0) and see the new task we created.
|
chmod +x setup.sh ./setup.sh |
Woah, cool. So we can quickly go from a fresh install to a loaded task with some scripting, but how do we do that across environments? Well, remember those CLI profiles we learned about earlier? That, combined with the common InfluxDB API across OSS and Cloud, means that we can simply add a new configuration profile and run the same script and it will create the stack and install it on InfluxDB Cloud.
How to Add Profiles to InfluxDB Setup Script
When we run things locally, we will most likely always use the “default” configuration profile that was set up when we first bootstrapped the instance, but we want this setup script to be used by our automation as well to update our InfluxDB cloud organization (our “prod” in this example).
That means we need to update our script to accept a command-line parameter that defines the profile to use.
We’ve added some logic to the top of the script to look for a parameter, and use it to set the profile if it exists. I’ll admit, I’m not the best bash shell scripter in the world, so I’m sure you’ll be able to make something a little nicer than this, but it gets the job done for now.
I’ve also taken care of a few other housekeeping items with this iteration. Since we want to be able to run this script multiple times, we will need to check to see if the local instance is set up before trying to set it up again. Also, we will need to check for an existing stack before trying to set up a new one, so we don’t get a bunch of duplicate stacks and resources — since names aren’t unique.
Note: If you want a quick way to reset (WARNING: it will delete all your local data) your local InfluxDB OSS instance, you can create a reset.sh script with the following lines:
|
#!/bin/bash
killall influxd # WARNING: THIS NEXT LINE WILL DELETE ALL YOUR DATA rm –r ~/.influxdbv2 influxd > /dev/null 2>&1 & |
Nothing fancy here, but saves some typing when you are building this out.
Now, where were we? When we run this new script with the name of the configuration profile as a parameter, it should attempt to switch to it. You probably only have one profile set up right now, but try setting up another one and checking that it works.
|
influx config create –n staging –u http://localhost:9999 -o influxdata -t $(influx auth list –json | jq -r ‘.[0].token’) Active Name URL Org staging http://localhost:9999 influxdata ./setup.sh staging Successfully set config profile to staging... Checking for existing stacks... Updating our stack with the task definition... |
Again, that --json flag comes in handy for extracting useful information — in this case, the token. We are assuming the first token in the list, but some jq kung fu could filter tokens by description if you have multiple.
There’s one last thing we need in order to make this script work well for us and our workflows. The process for deploying this will spin up a brand new virtual machine, download a fresh copy of the InfluxDB CLI tool, and try to run this script. That means we won’t have any configuration profiles set up, and the script will need to create one for us.
In the case where we can’t find a configuration profile that was passed in, let’s check for the appropriate environment variables; and if we find them, we can create the profile on the fly.
Now, to try this out, you can run the install script with the INFLUX_TOKEN, INFLUX_ORG, and INFLUX_URL set, like so:
|
INFLUX_URL=http://localhost:9999 INFLUX_ORG=influxdata INFLUX_TOKEN=$(influx auth list —json | jq –r ‘.[0].token’) ./setup.sh prod Active Name URL Org * prod http://localhost:9999 influxdata Checking for existing stacks... Applying our stack... Everything was set up successfully! |
If you run influx config ls you should see your new profile with the same name set to active.
We’ve covered a lot of ground so far. It’s probably a good idea to check everything in. I’ll see you after you’ve run git add ., git commit -m ‘feat(stacks): initial stack’ and git push origin master and we will set up the GitHub Action.
Use GitHub Actions for Automated Deployment
GitHub Actions are a powerful tool to add automation to your GitHub repositories. This post isn’t meant to be a complete walkthrough of how they work or what they can do, so we are only going to focus on the bare essentials to get this automation going.
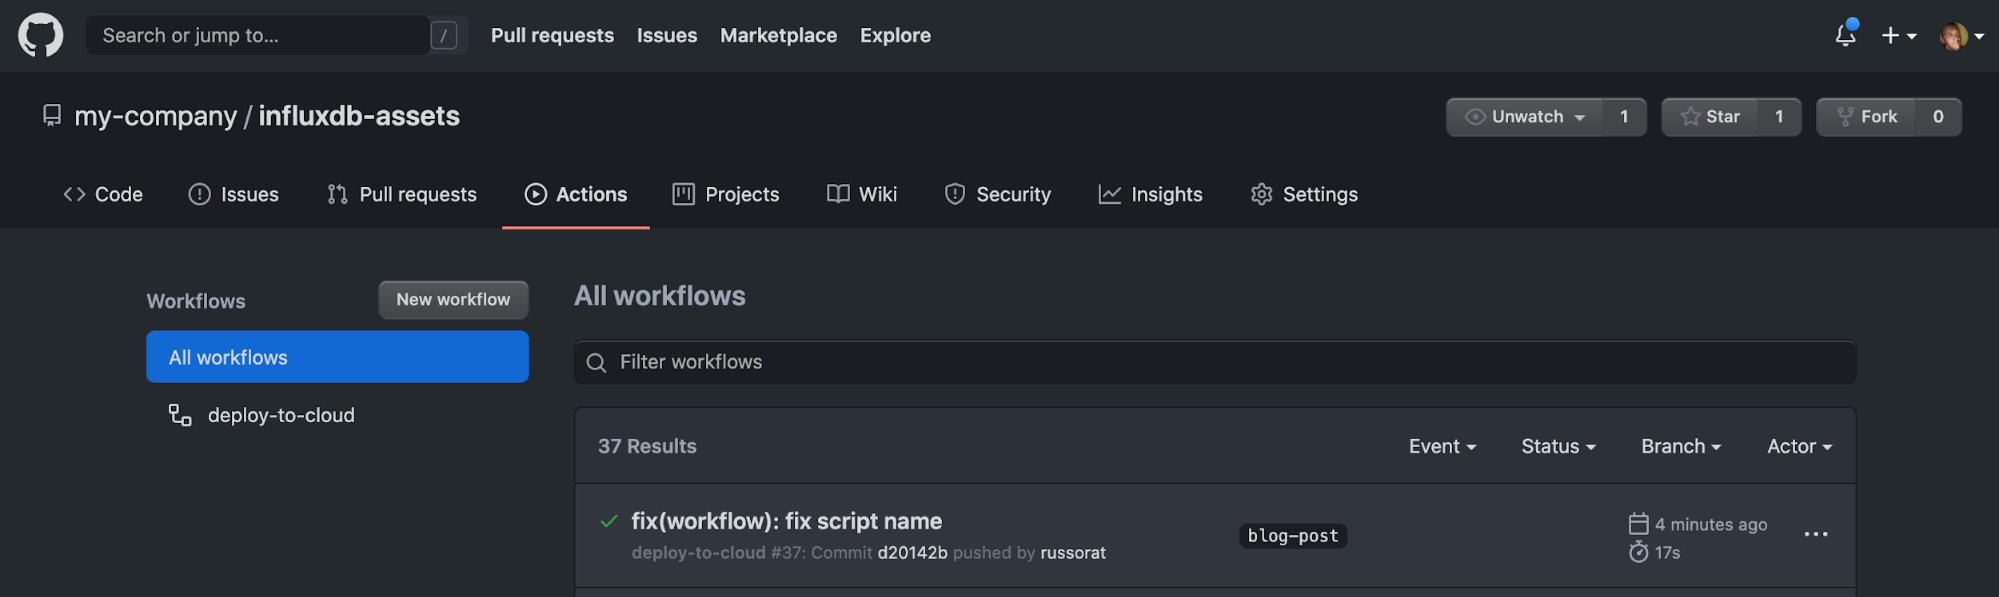
To access GitHub Actions, just click on the Actions tab in the root of your project, and you will be prompted to create a new workflow. We are going to create a workflow that will run the script that we’ve been working on, but instead of sending it to our local instance of InfluxDB, it is going to apply that to a cloud account that we’ve set up — which is acting like our prod instance.
Once you create a new workflow in GitHub Actions, you can configure it to grab the latest InfluxDB OSS nightly (needed so we can get access to the CLI tooling), then use that to apply the stacks to your cloud instance.
The first section after the name of the workflow lets GitHub know when to run the workflow. In this case, it’s anytime someone merges something into the master branch. To learn more about other triggers, check out the GitHub documentation for Triggers.
Next, we define our GitHub Jobs. In this case, we only need one job that deploys our code to our cloud instance, but you could have multiple here. It’s probably a good idea to run a workflow whenever someone opens a pull request that would try to install the assets into a local InfluxDB instance, so you can check for any errors before sending them to production.
As part of our job, we define some environment variables to send into our script. Obviously, we don’t want to expose our tokens to the world, so GitHub allows you to define secrets at the repository level, which are hidden from the users and redacted in logs. You can find those in the Settings section of your repo. The organization, token, and URL can all be found in the Load Data section of your InfluxDB Cloud account.
Finally, here are the steps of the script, which are relatively simple. We first download the latest nightly of InfluxDB OSS (you could use a versioned copy as well, which is less prone to errors), set it up, then run our install script with the prod configuration profile. Just like it would on our local machine, the script will pick up the environment variables and set up a new profile for us, this time connecting to our cloud account.

Recap and Final Thoughts
Congratulations! If you’ve made it this far, you have successfully set up an automated deployment to your InfluxDB cloud account, and are well on your way to a complete GitOps-style workflow for managing your InfluxDB assets.
As you start to add additional Stacks to your production instance, I recommend you put them each in their own folders — potentially with a README.md with some additional information about who owns that Stack and what its purpose is. You will need to add stacks to the script for each folder, but I’m sure you can figure out how to automatically pick up new folders and dynamically create new stacks as needed.
If you have any thoughts or suggestions about this workflow, we’d love to hear them. Join us in our community Slack workspace and let us know what can be improved. You can also open issues for any bugs you run into in our InfluxDB GitHub repo.
Feature image via Pixabay.
At this time, InApps Technology does not allow comments directly on this website. We invite all readers who wish to discuss a story to visit us on Twitter or Facebook. We also welcome your news tips and feedback via email: [email protected].
Source: InApps.net
Let’s create the next big thing together!
Coming together is a beginning. Keeping together is progress. Working together is success.


