


- Home
- >
- Software Development
- >
- The Dark Art of Engineering Decisions – InApps Technology 2022
The Dark Art of Engineering Decisions – InApps Technology is an article under the topic Software Development Many of you are most interested in today !! Today, let’s InApps.net learn The Dark Art of Engineering Decisions – InApps Technology in today’s post !
Read more about The Dark Art of Engineering Decisions – InApps Technology at Wikipedia
You can find content about The Dark Art of Engineering Decisions – InApps Technology from the Wikipedia website
![]() Building functioning hardware is hard.
Building functioning hardware is hard.
It’s hard due to the myriad design decisions and compromises you’ll have to make as your project evolves.
Take my recent generation-5 steampunk conference badge, for example. It’s an all-new design with a WiFi-equipped Raspberry Pi 3, a 3.5” color TFT touchscreen display, an auxiliary Arduino Pro Mini, wrapped in “Dr. Torq” exposed brass tubing and leather steampunk aesthetic.
The Arduino was added for analog and near real-time sensing capabilities. Readers will recall that the Pi has strictly digital general purpose input/output (GPIO) pins. My plan was to use 4 photo-cells (analog devices) and a couple of DS18B20 digital thermometers, as physical input devices. Why use push-buttons when you can detect an input by just putting your finger on or over a sensor.
While sensing 4 analog photocells was a no-brainer with the Arduino, reading the DS18B20s presented a problem. The latter requires a roughly 750 ms read cycle, which means that the Arduino will be waiting around for temperature data from the device when it should be measuring the photocells and detecting other inputs. Waiting for the DS18B20 negates the near-real-time capability of using the Arduino in the first place.
Still, I wanted to be able to sense temperatures, including perhaps a string of them, which the DS18B20 allows via its standard bus architecture, while at the same time, not hold up the other readings.
What to do?
Shazam, Goober! Running the Raspbian OS on the Pi is one potentially great solution. Just hook up the DS18B20 to a pin on the Pi and use the built-in one-wire bus reading capability. The Arduino is then free to spin through its analog photocell (and any other future sensor) inputs at normal speed, without having to resort to using interrupts or enduring long time delays. We can integrate the temperature sensors with the analog data from the Arduino, in the applications we write on the Pi.
Connecting the DS18B20 to the Pi
The Dallas DS18B20 sensor can be hooked up in one of two ways. The traditional way is to attach the Vcc lead to 3.3 volts, the ground lead to ground and the data lead to a digital pin on the Raspberry Pi. A small value resistor, of between about 5 and 10K Ohms, goes between the data lead and 3.3 volts. This resistor acts as a pull-up, ensuring stable and predictable data-line behavior. On the Gen-5 badge, I connected the DS18B20 data pin to GPIO04, on the Pi. You can see the resistor between GPIO04 and the 3.3-volt pins on the Pi header, in the following picture:
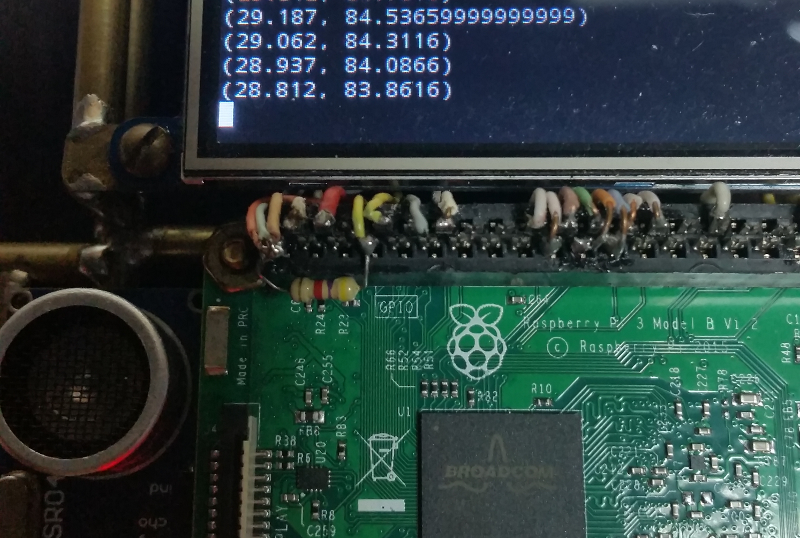
Resistor connected between 3.3 volts and the GPIO04 pin.
Originally, I wanted to use the DS18B20 in “parasitic” mode. This configuration connects the chip’s Vcc lead to the ground lead, then routes the data pin to the Raspberry Pi GPIO pin, with the resistor bridging from the data pin to 3.3 volts. This way, you only need two wires for the bus, instead of three, as in the more traditional hook-up.
Unfortunately, I wasn’t able to make this arrangement work. I’d just get constant high values when reading the sensor, much like as if the device wasn’t connected to the input pin. No matter, regular mode was adequate for my purposes.
Hooking up the sensor was straightforward. I used 6-inch lengths of 24-gauge flexible wire to connect the sensor to Vcc, ground and GPIO04 on the Pi. The wire was pirated from an old serial mouse cable. If you need to, swing by a Goodwill or Thrift Store and snag a handful of the defunct beasts for a couple of bucks. This kind of wire is invaluable for microcontroller device building, particularly for wearables. You may be able to use the leftover encoders, sensors and other parts inside the mouse in other projects.
With the hardware connected together, all we have to do then is read the sensor and print out the result.
Temperature One-Liners
A package called w1thermsensor makes reading a DS18B20 sensor trivial. It can also read several other so called “one-wire” devices. The library works with both the Raspberry Pi and BeagleBone microcontrollers.
I just logged onto the Gen-5 badge remotely, using ssh, from my Linux notebook and installed the software using apt-get.
|
pi@raspi% sudo apt–get install python3–w1thermsensor |
Once it’s installed on the Pi, you have the option of reading the temperature sensor from a Python program or from the command line. We’ll just discuss the command line version now and cover the Python calls in a future Off-The-Shelf Hacker article.
You can get a list of the connected DS18B20 devices with the following line.
|
pi@raspi% w1thermsensor ls |
The printout will look like the following:
|
Found 1 sensors: 1. HWID: 0000018a5052 Type: DS18B20 |
To read the sensor, use the “get” option.
|
pi@raspi% w1thermsensor get 1 |
Here’s a sample result, “1” being the first device on the bus.
|
Sensor 0000018a5052 measured temperature: 29.312 Celsius |
As expected there was a slight delay before the temperature value showed up on the terminal.
Note the device number “0000018a5052” appears in the two commands. Additional sensors will have different device numbers. To sort out which one is which, you could just grab one of the sensors, with your fingers, to raise the temperature, then just watch which device temperature on the printout with repeated use of the “all” option.
|
pi@raspi% w1thermsensor all —type DS18B20 |
Use the up-arrow in the terminal window, followed by the “enter” key, to repeat your last command.
Certainly, reading a temperature and integrating it into a user interface, requires a different approach than a simple command line printout. The Linux command line is a useful tool for rapid prototyping and proving that your hardware works properly.
Don’t forget that with the DS18B20 being read by a pin on the Raspberry Pi, my little auxiliary Arduino Pro Mini can run its analog (and digital) inputs a full speed and then seamlessly forward the data to the Pi via a serial port. Not only that, through the magic of Linux, we can access the DS18B20 data from inside a terminal window, through a Python program and/or even as a background job feeding some script that pushes the data up to the Cloud, if we want.
Cool stuff, right?
Next Steps
My “building functioning hardware is hard” perspective is based on the fact that current physical computing stack projects are a mix of microcontroller modules, firmware (as in the case of an Arduino), software and Linux, along with sensors, connections to the GPIO pins, networking and so on. There’s always a lot you need to take into account and it can be a steep (as well as voluminous) mountain to climb as you work through your projects.
Engineering, in hands-on practice, always involves compromises and educated guesses. That’s what makes it interesting. Then you prototype, validate and refine. Occasionally, projects may even turn into profitable products.
It’s the greatest time in history to be a geek.
InApps Technology is a wholly owned subsidiary of Insight Partners, an investor in the following companies mentioned in this article: Shelf, Torq.
Source: InApps.net

Let’s create the next big thing together!
Coming together is a beginning. Keeping together is progress. Working together is success.


