


- Home
- >
- Software Development
- >
- Your First Pull Request – InApps 2022
Your First Pull Request – InApps is an article under the topic Software Development Many of you are most interested in today !! Today, let’s InApps.net learn Your First Pull Request – InApps in today’s post !
Read more about Your First Pull Request – InApps at Wikipedia
You can find content about Your First Pull Request – InApps from the Wikipedia website
Welcome back, Git fam! We have come so far together as you learn to get legit with Git. From setting up your very first local Git repository and establishing a GitHub account to hold all your project code to staging committing, pushing, forking and cloning — you have learned much, grasshopper. Well done.
Today you’re be taking the next step to full Git, and GitHub, legitimacy as a developer: your first pull request.
What Is a Pull Request?
Fundamentally, pull requests are the mechanism for contributing to a group project. Pull requests happen when you fork/clone a project, make changes to the codebase or add a feature, or do other work, and then are ready to merge your improvements back into the master branch on the main repository. When everything is truly ready for prime time, you file a pull request to the original project via your GitHub account. (That at least is the basic workflow — there is a bit more to it than that, as you will see). This lets the project head(s) know that you did a thing, and so they should review it and if it’s good then merge it into master as a permanent part of the project.
But PRs are more than simply a mechanism for contributing project changes. The pull request process also serves as a discussion forum. At first, why was this change necessary, what you did, what the results were. Then the project maintainer or other contributors can comment on your changes, alert you to problems, or even add to your work by pushing follow-up commits — all inside the pull request!
Pull requests are the heart of open source code, and the pivot upon which GitHub group projects turn. When you are a beginning coder, chances are you have not yet used features from third-party projects. There are a billion uber cool, and useful, open source libraries, tools and shortcuts out there, things that people have built and shared. You will naturally discover them as you write more and more of your own code, build more things, and get more experience. Becoming an open source contributor is a natural extension to the process of becoming a more advanced programmer: as you start incorporating these awesome open source resources in your own code, you will start to notice bugs or maybe think of a useful new feature that could be added.
This is where the pull request comes in: it’s how you contribute to, and make your own code part of, the open source universe.
First, We Fork
Ok, so Future Dev You found a bug or had a great feature idea. Time to make your first pull request.
Well, almost time. A few things need to happen before you actually click that green “Open Pull Request” button on GitHub. First things first: before you just go writing code on a project that is not your own, open source etiquette dictates that you ask first. For all you know, they may already be working on that great new feature you just (also) thought of, or maybe there is an important reason why it doesn’t already exist. You only know by asking. There are a few other social considerations before jumping in on a project with a pull request from out of the blue, so maybe go read A Polite Guide to Pull Requests before you try this at home.
Step 1: Fork the original project into your own GitHub account, and then clone it to your computer.
You fork the original project to get an entire current working copy of the codebase into your own hands, and then clone it down to your local working environment to begin working that coding magic.
I have created a public GitHub repo called Pull Request Practice to give you a safe place to try out your pull request ride, before we take the training wheels off. So go there and fork that and clone it to your laptop, please. Directions are in the README text right there on the repository.
If you’re not sure how to do this, or maybe just rusty, please go review the forking and cloning tutorial previous in this series.
Step 2: Make a local branch for your new code.
Once the project is all fired up in your local work environment, the first thing to do is create a brand new branch for your brand new code. This is because, when you cloned the repo to your computer, you set up a copy of the master branch from the main online project repository. Remember our rule: Don’t Mess With Master. Creating a new branch for experimenting and changing things is always a good idea, whether working on your own small project or contributing to a group effort. PRs are no exception. While you’re at it, be sure to give the new branch a short but informative name that reflects the work you’re doing.
For a review of how to go about branching in Git, check out our Working WIth Branches in Git tutorial. (It comes complete with helpful code snippets but as a hint: $git checkout -b newBranchName). For the purposes of this tutorial, please name this branch after yourself: FirstName-LastName.
Step 3: Create!
This is where you would dig into the code you just downloaded and make the changes/additions you dreamed up, or stomped those bugs.
Since this is a first pull request tutorial, though, we are just going to add your name to the list of fellow pull request practicers.
So! In terminal, please change directory (cd) to the root of the project — i.e., the directory called TNS-Pull-Request-Practice you cloned to your computer. Create a new file and name it after yourself using the convention FirstName-LastName.html (e.g. michelle-gienow.html).
Now, open the project in your text editor of choice and put in some quick placeholder text. A classic “Hello, World!” will do the trick. (Yes this is an HTML file, but don’t sweat markup code if you’re not HTML5-savvy — you can just literally type the words “Hello” and “World” in the text editor). Save your changes. This is the file you will be (1) pushing to GitHub and then (2) making a pull request for me to add it to the TNS-Pull-Request-Practice repo.
Step 4: Merge your branch into master, then delete it.
Having made your addition to the project on your named-after-you branch, it’s time to merge the changes back into master: in terminal, $git checkout master to switch from your temporary branch to master. Then $git merge FirstName-LastName.
Once you’ve successfully merged back into master, delete your branch. You’ll never use it again, and there’s no point pushing cruft to GitHub. $git branch -d FirstName-LastName
Should be a straightforward merge, but again, if you run into trouble, consult Working with Branches in Git article.
Step 5: Stage. Commit. Push.
Pretty sure you got this core part of the GitHub workflow down, but now is the time when you $git add, $git commit, and $git push -u origin master your newly created FirstName-LastName.html file. If you need a refresher, refer to Getting Started with Git and GitHub, the first in our tutorial series.
Step 6: Your First Pull Request
Now comes the big moment: your first pull request!
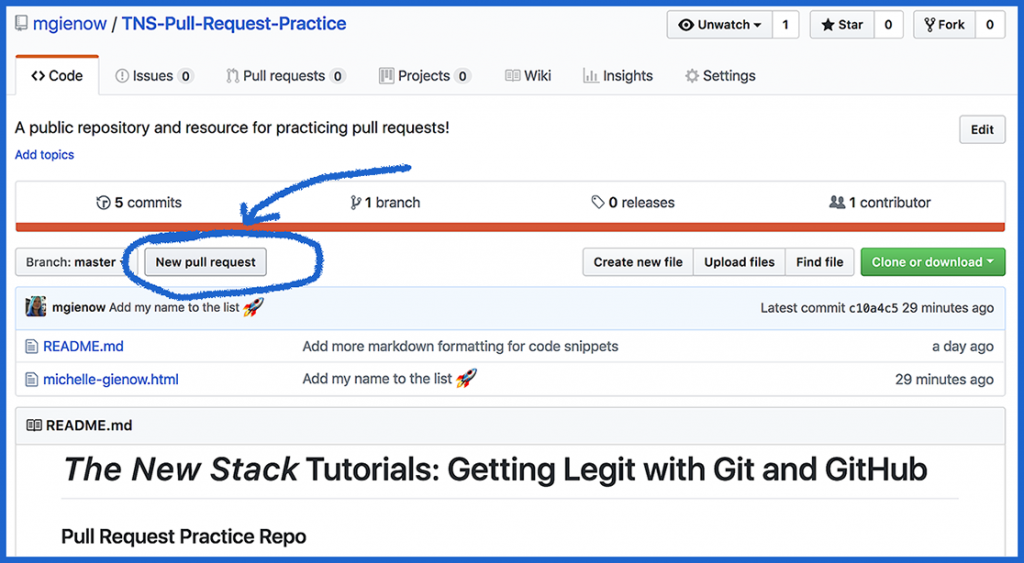
Go back to the original TNS Pull Request Practice repository on GitHub — not your own page, but the one you first forked the practice exercise from.
Click the tab that says “New Pull Request.”
This will take you to a new screen that looks like this:
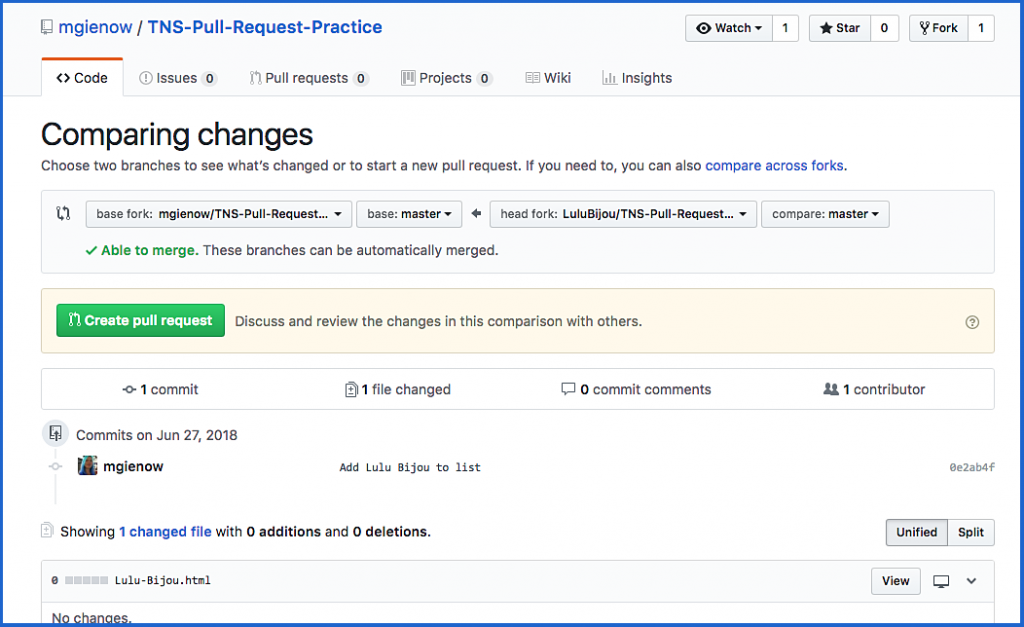
For the purposes of this exercise, my alter ego Lulu Bijou forked, cloned, branched, touched, created, added, committed, and pushed Lulu-Bijou.html to our repo.
Hit “Create pull request.” That is, so long as the green check mark and “Able to merge” are active and present on the page. If there are merge problems, GitHub will offer some advice as to how to fix them, but you’re not going to be able to do a pull request until everything is merge-able. Give that this is a very simple add-a-name-file exercise, chance of merge problems are pretty small.
This will bring up a screen that looks like this:
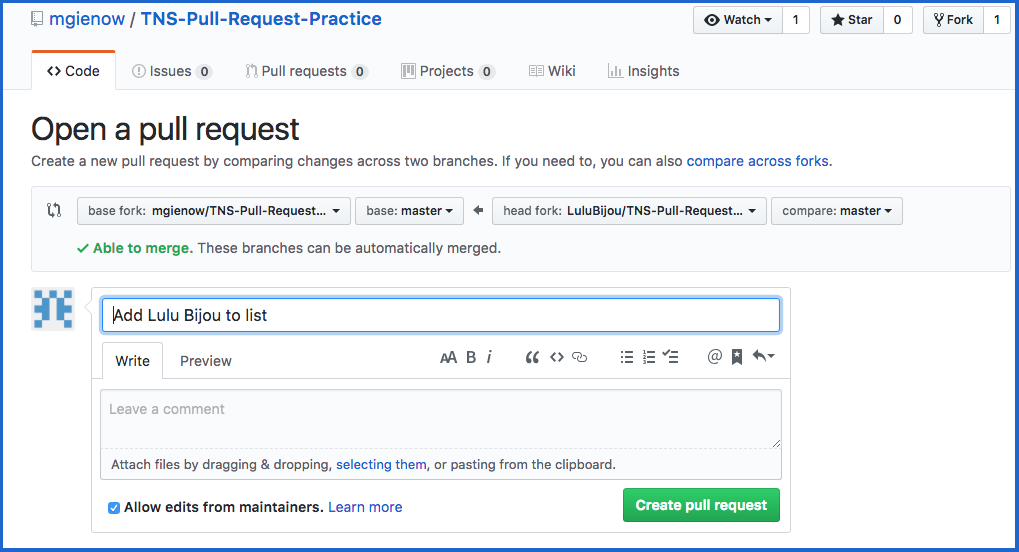
Yes, it’s a two-step process: you have to hit “create pull request” AGAIN, just to let GitHub know you really do for sure want to do this. Click it.
Aaaannddd… That’s it. Your first pull request. Only, it may kind of feel like nothing happened?
It did, though. Behind the scenes, GitHub notifies the owner/maintainer of the repository you’re contributing to that you’ve submitted a pull request. They go and take a look at your hard work, and can choose to simply merge it into the main branch so that your code is now One With Master, or they may message you back with comments and questions.
This is what it looks like on my end, when you send me that pull request to add your name to the TNS Pull REquest Practice repo:
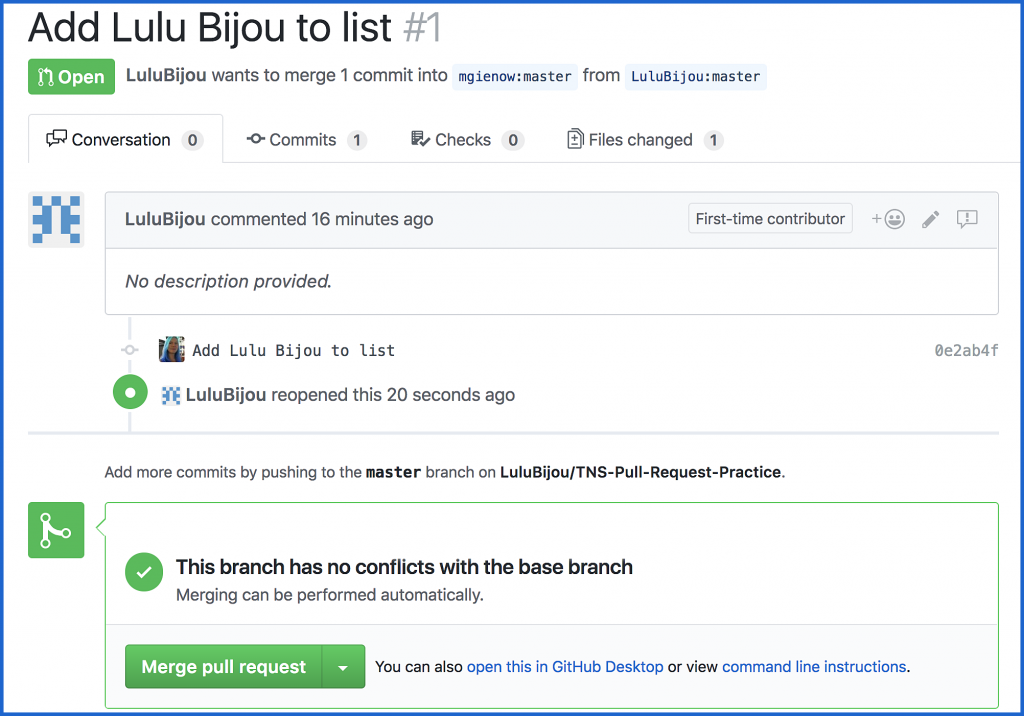
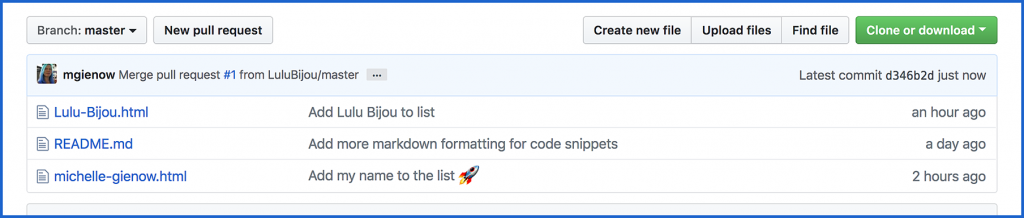
Since there are no conflicts with the base branch, I go ahead and click “Merge pull request.” You get a message, via GitHub, that I’ve accepted your pull request. Evidence of your success will finally be visible on the original repo, where Lulu-Bijou.html is now in residence:
Ok. Your turn. Go!
Feature image by Darinka Kievskaya on Unsplash.
Source: InApps.net

Let’s create the next big thing together!
Coming together is a beginning. Keeping together is progress. Working together is success.


