- Home
- >
- Mobile apps development
- >
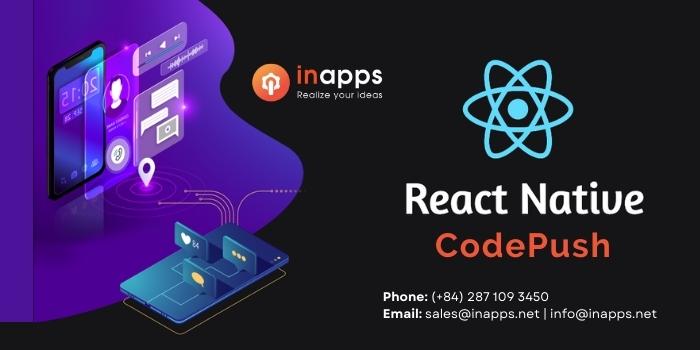
- Implement CodePush in React Native App – Simple Tutorial
This post explains how to set up a CI/CD process using App Center React-native and CodePush and integrate it into a React Native app to automate the build, test, and distribution processes.
Unlike other platforms, mobile is a one-of-a-kind environment requiring a thorough understanding of the development lifecycle.
Before CI/CD, mobile developers had to do several time-consuming tasks to deploy the app to consumer devices. Adopting the mobile DevOps method, as a result, is a game-changer in the field of mobile development. It facilitates seamless operations by allowing all teams to complete tasks as quickly as possible.
React Native Code Push
Key Summary
- Purpose: Use Microsoft’s CodePush to deliver over-the-air (OTA) updates to React Native apps, bypassing app store review processes for faster deployments.
- Setup:
-
-
- Install CodePush CLI (npm install -g code-push-cli) and create an account.
- Register the app with CodePush (code-push register, code-push app add).
- Integrate CodePush SDK into the React Native project (npm install react-native-code-push).
- Configure the app to check for updates (e.g., in App.js with codePush.sync()).
-
- Deployment:
-
-
- Bundle the app (react-native bundle) and push updates via code-push release-react.
- Manage releases (e.g., rollback, promote) using CodePush CLI commands.
-
- Benefits: Enables instant updates for JS and assets, supports staged rollouts, and improves user experience with minimal downtime.
- Considerations: Requires careful testing to avoid breaking changes; not suitable for native code updates.
What is CodePush?
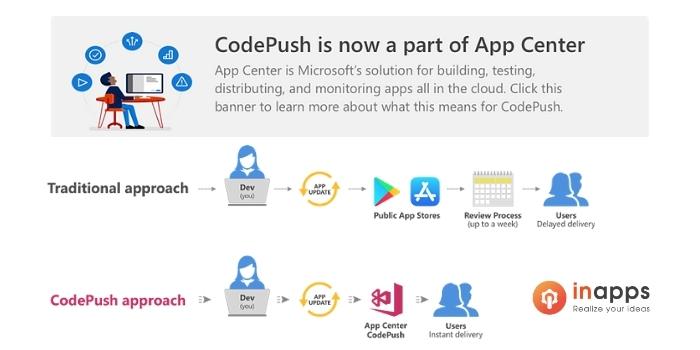
CodePush is a cloud service available through App Center that allows React-Native developers to push mobile app updates straight to their consumers’ devices.
When fixing issues or introducing modest features, you do not need to re-build a binary and re-distribute it through the different app stores. You can have a more predictable and direct interaction model with your userbase.
Why CodePush?
Problems:
When you start developing mobile apps, something strange happens. You understand that the project’s owner will want to check how far you’ve progressed with the task at some time. Unlike a web app, where you might provide a URL to the client to verify, for mobile (e.g., android), you must create what is known as a “release apk” and deliver it to the client.
The apk might sometimes be 40Mb or more in size. We usually post the apk to Google Drive and let the customer download it from there (Of course, there are other fine-grained methods like hosting as a beta in Playstore).
The difficulty today is that every time you make a new modification (for example, fixing a mistake or changing colors) that the customer wants to view, you must create a new build and submit it to Google Drive again.
As a result, the project owner must delete the previous app from his phone and download the latest build, 40Mb or more. And let’s hope you didn’t make any more mistakes since you’ll have to start over.
Solutions:
In basic terms, CodePush ensures that the user does not have to uninstall his app and reinstall a new 40Mb program every time there is a new update. Instead, the user is informed that there is a new update and, if he accepts it, the new/required modification will be downloaded while he is still using the app. The size of the needed update, such as 3Mb, 2kb, and so on, will be downloaded, rather than the whole 40mb+ app.
Another great feature of CodePush is keeping a copy of every version of the update you deploy. The benefit of this is that you can revert to the last functional update if you issue a new update and it crashes the app.
What is Code Push?
There’s so much more, but this is only a taste. I believe you now see the whole picture. So, let’s look at how we can include CodePush into our React Native app.
How does CodePush work in React Native?
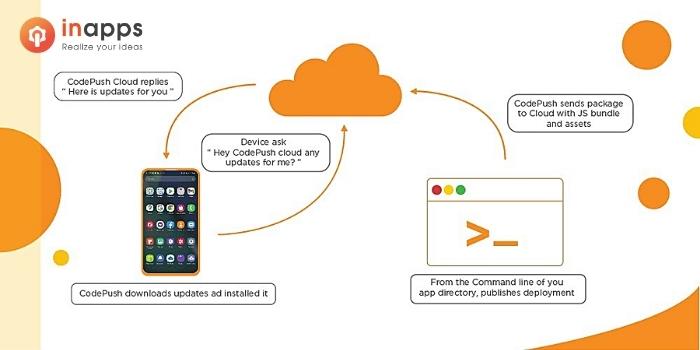
A React Native app comprises JavaScript files and any supporting images, which are bundled and distributed as part of a platform-specific binary by the packager (i.e., .ipa or .apk file).
By keeping your JavaScript and graphics in sync with updates you push to the CodePush server, the CodePush plugin helps immediately bring product upgrades to end customers. As a result, your app benefits from an offline mobile experience as well as the “web-like” agility of side-loading updates as soon as they become available. It’s a win-win!
React Native Code Push stores a copy of each CodePush deployment and a control version on its server if a rollback is required; this can be done practically instantaneously.
This is controlled using a user-friendly control interface supplied by Microsoft, which allows you to oversee both CodePush and traditional deployments.
Appcenter React-Native
It also enables concurrent versions on a wide range of devices and platforms.
The library has a plethora of configurable choices, including the ability to specify when to check for and download new versions of React Native CodePush for the app and the ability to utilize events to identify when each of these processes is complete. You may, for example, alert the end-user that a new version will be installed the next time the program is restarted.
How to set up CodePush React Native
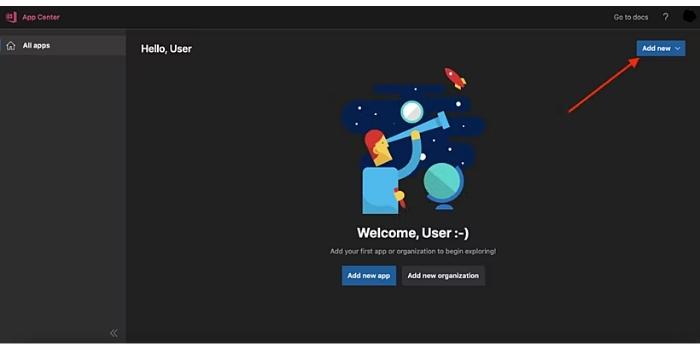
After you’ve joined up and logged in to your dashboard, the next step is to build your App in the App center, which may be either iOS or Android.
Click the “Add New” button from your dashboard.
Appcenter React-Native
This opens a new page where you may create your app; we’ll do this again, once for iOS and once for Android.
React Native CICD
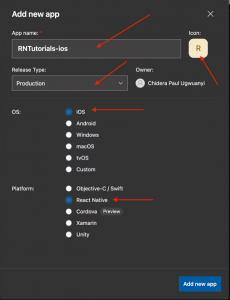
For iOS, fill out the form as follows:
- App Name: Your app name (Ex: RNTutorials-ios)
- Icon: Your app icon
- Release Type: Select Production
- OS: Select iOS
- Platform: Select React Native
To finish the procedure, click the Add new app option. It will lead you to the overview screen of the freshly built app, where you will find information about statistics and app center crashes. Return to the previous page or click the Add New icon on the dashboard once more to build for Android as follows:
- App Name: Your app name (Ex: RNTutorials-android)
- Icon: Your app icon
- Release Type: Select Production
- OS: Select Android
- Platform: Select React Native
To finish the procedure, click the Add new app option. The newly generated Apps should now be visible on your dashboard.
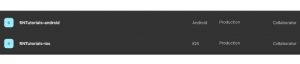
Appcenter React Native
Click on any of them, starting with:
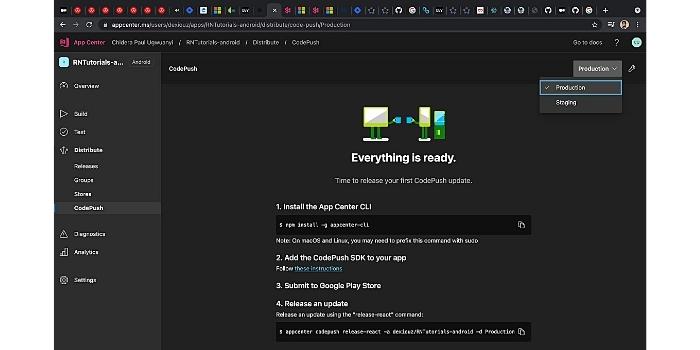
RNTutorials-android > Distribute > CodePush > Create standard deployments.
App center will establish two settings for you in this manner: staging and production. Production will be used in this guide.
Go to iOS App and follow the same steps:
RNTutorials-ios > Distribute > CodePush > Create standard deployments.
react-native-code-push
Install the library in the ReactNative project
After you’ve followed the standard “getting started” steps to create your CodePush account, you can begin CodePush-ifying your React Native app by executing the following command from the root directory of your project:
npm install –save react-native-code-push
or
yarn add react-native-code-push
iOS Setup
Plugin Installation and Configuration for React Native 0.60 version and above.
Run cd ios && pod install && cd .. to install all the necessary CocoaPods dependencies.
Open up the AppDelegate.m file, and add an import statement for the CodePush headers:
#import <CodePush/CodePush.h>
Find the following line of code, which sets the source URL for bridge for production releases:
return [[NSBundle mainBundle] URLForResource:@”main” withExtension:@”jsbundle”];
Replace it with this line:
return [CodePush bundleURL];
This change configures your app to always load the most recent version of your app’s JS bundle.
NOTE:
The bundleURL method assumes your app’s JS bundle is named main.jsbundle. If you have configured your app to use a different file name, simply call the bundleURLForResource: method (which assumes you’re using the .jsbundle extension) or bundleURLForResource:withExtension: method instead, in order to overwrite that default behavior.
Typically, you’ll only want to use CodePush to resolve the location of your JS bundle within release builds, and therefore, we recommend using the DEBUG pre-processor macro to dynamically switch between using the packager server and CodePush, depending on whether you are debugging or not.
This will make it much simpler to ensure you get the right behavior you want in production, while still being able to use the Chrome Dev Tools, live reload, etc. at debug-time.
Your sourceURLForBridge method should look like this:
| – (NSURL*)sourceURLForBridge:(RCTBridge *)bridge
{ #if DEBUG return[[RCTBundleURLProvider sharedSettings] jsBundleURLForBundleRoot:@”index” fallbackResource:nil]; #else return [CodePush bundleURL]; #endif } |
Add the Deployment key to Info.plist :
To let the CodePush runtime know which deployment it should query for updates against, open your app’s Info.plist file and add a new entry named CodePushDeploymentKey , whose value is the key of the deployment you want to configure this app against.
You can retrieve this value by running appcenter codepush deployment list -a <ownerName>/<appName> -k and copying the value of the Key column which corresponds to the deployment you want to use.
In order to effectively make use of the Staging and Production deployments that were created along with your CodePush app, refer to the multi-deployment testing docs below before actually moving your app’s usage of CodePush into production.
Android Setup
Plugin Installation and Configuration for React Native 0.60 version and above.
In the android/settings.gradle file, make the following additions at the end of the file:
| …
include ‘:app’, ‘:react-native-code-push’ project(‘:react-native-code-push’).projectDir = new File(rootProject.projectDir, ‘../node_modules/react-native-code-push/android/app’) |
In the android/app/build.gradle file, add the codepush.gradle file as an additional build task definition underneath react.gradle:
| …
apply from: “../../node_modules/react-native/react.gradle” apply from: “../../node_modules/react-native-code-push/android/codepush.gradle” … |
Update the MainApplication.java file to use CodePush via the following changes:
| …
// 1. Import the plugin class. import com.microsoft.codepush.react.CodePush; public class MainApplication extends Application implements ReactApplication { private final ReactNativeHost mReactNativeHost = new ReactNativeHost(this) { … // 2. Override the getJSBundleFile method in order to let // the CodePush runtime determine where to get the JS // bundle location from on each app start @Override protected String getJSBundleFile() { return CodePush.getJSBundleFile(); }; } |
Add the Deployment key to strings.xml:
Open your app’s strings.xml file and add a new CodePushDeploymentKey, whose value is the key to the deployment you wish to set up your app against.
You can retrieve this value by running appcenter codepush deployment list –a <ownerName>/<appName> –k and copying the value of the Key column which corresponds to the deployment you want to use.
Refer to the multi-deployment testing documentation below before pushing your app’s CodePush use into production to make the most of the Staging and Production deployments produced along with your CodePush app.
The strings.xml should look like this:
| <resources>
<string name=“app_name”>AppName</string> <string moduleConfig=“true” name=“CodePushDeploymentKey”>DeploymentKey</string> </resources> |
How to implement CodePush in your React Native project
React native code push
Modify JS Code
Wrap your root component with the code push higher-order component (HOC):
For class component:
| import codePush from “react-native-code-push”;
class MyApp extends Component { } MyApp = codePush(MyApp); |
For functional component:
| import codePush from “react-native-code-push”;
let MyApp: () => React$Node = () => { } MyApp = codePush(MyApp); |
Run the app to ensure it is operational, and keep an eye on the metro server logs. You should be able to see that you’re asking CodePush whether there’s a version available to download.
Release a version to CodePush
Go to AppCenter -> Distribute -> CodePush
Find the release command and make sure you are using the right params.
The release command is:
| appcenter codepush release-react -a <owner_name>/<app_name> -d Production |
Refresh the AppCenter dashboard to ensure your release is still there when the upload is finished.
Now relaunch the app and examine the metro server logs; you should get the latest version via CodePush. This updated, downloaded version will be put on the device during the second session (close and reopen the app), and you will notice your modifications.
NOTE:
To compel the app to install the newest code push version in the same session that it downloads the bundle, mark the code push version as a mandatory update in the App Center dashboard.
That’s all. Congratulations on successfully integrating the CodePush service into your React Native app.
If you found this post helpful, please like it, and share it with your friends.
If you want more like this, visit our Mobile apps development blog category.
[sociallocker id=”2721″]
[/sociallocker]
Let’s create the next big thing together!
Coming together is a beginning. Keeping together is progress. Working together is success.