- Home
- >
- Mobile apps development
- >
- Running expo and raw react-native together
Hello world! Glad you asked this question, about ejecting your expo app. Well, you might have been asked by your senior developer, or boss or you might have just heard it from someone but don’t exactly have a good acquaintance with it. In this article we’ll try to answer these questions, all of you might be dead curious to know this in the simplest way –
- Why do we need to eject an expo app, although it gives us a tonne of features?
- Can we use some modules which have native code with expo like pusher, react-native-modal, etc?
- how to make expo and react native work together?
Let’s add a secret ingredient called expo-starter-kit to make all of this happen with a breeze.
Key Summary
- Overview: The article by InApps Technology explores how to combine Expo and raw React Native in a single project, detailing the benefits, challenges, and practical steps to leverage Expo’s simplicity alongside raw React Native’s flexibility for advanced native functionality in mobile app development.
- Context:
- Expo: A framework and platform for building React Native apps, offering a managed workflow with pre-configured tools, libraries, and a simplified build process, ideal for rapid prototyping and cross-platform development.
- Raw React Native: The standard React Native framework, providing a bare workflow with full access to native code (iOS/Android), suited for apps requiring custom native modules or complex integrations.
- Combining both allows developers to use Expo’s ease for most features while accessing raw React Native for native capabilities not supported by Expo.
- Why Combine Expo and Raw React Native?:
- Expo Benefits:
- Quick setup with pre-built libraries (e.g., camera, maps) via Expo SDK.
- Simplified build and deployment with Expo’s CLI and cloud services.
- Over-the-air (OTA) updates for instant app changes without app store resubmissions.
- Raw React Native Benefits:
- Full access to native iOS (Swift/Objective-C) and Android (Kotlin/Java) code for custom modules.
- Supports advanced integrations (e.g., Bluetooth, native UI components) unavailable in Expo.
- Greater control over build configurations and third-party native libraries.
- Hybrid Need: Developers may want Expo’s speed for MVP development but need raw React Native for specific native features (e.g., custom hardware access).
- Expo Benefits:
- How to Run Expo and Raw React Native Together:
- 1. Start with Expo Project:
- Initialize an Expo project using expo init <project-name>, choosing a managed workflow (e.g., TypeScript or JavaScript).
- Develop core features using Expo SDK modules (e.g., expo-camera, expo-location).
- 2. Eject to Bare Workflow:
- Run expo eject to convert the Expo project into a raw React Native project, generating ios and android directories with native code.
- Retains Expo SDK functionality via the expo package but allows native code customization.
- Note: Ejection is a one-way process; you cannot revert to a fully managed Expo workflow.
- 3. Configure Unimodules (Now Expo Modules):
- Install expo-modules-core and other Expo modules to maintain access to Expo SDK features in the bare workflow.
- Update ios/Podfile and android/build.gradle to include Expo dependencies.
- Example: pod ‘EXCore’, :path => ‘../node_modules/expo-core/ios’.
- 4. Add Custom Native Code:
- Write native modules in Swift/Kotlin for iOS/Android to implement features not supported by Expo (e.g., custom Bluetooth APIs).
- Bridge native modules to JavaScript using React Native’s Native Modules API.
- 1. Start with Expo Project:
Example (iOS):
@objc(MyModule)
class MyModule: NSObject {
@objc func doSomething(_ callback: RCTResponseSenderBlock) {
callback([NSNull(), “Result”])
}
}
- 5. Maintain Expo Client Compatibility:
- Use expo-dev-client to create a custom Expo client that includes your native code, allowing testing in Expo Go with custom modules.
- Install: expo install expo-dev-client.
- Build custom client: expo run:ios or expo run:android.
- 6. Test and Deploy:
- Test the app using Expo’s development tools (e.g., expo start –dev-client) and raw React Native CLI (npx react-native run-ios).
- Deploy via app stores (manual builds for iOS/Android) or use Expo’s EAS (Expo Application Services) for streamlined builds and OTA updates.
- Benefits:
- Flexibility: Combines Expo’s rapid development with raw React Native’s native power.
- Rapid Prototyping: Use Expo for quick MVP iterations, adding native features as needed.
- Cost Efficiency: Offshore development in Vietnam ($20-$50/hour via InApps Technology) reduces costs by 20-40% compared to U.S./EU rates ($80-$150/hour).
- Scalability: Supports complex apps with custom native integrations while retaining Expo’s simplicity for standard features.
- Challenges:
- Complexity: Managing a hybrid workflow requires understanding both Expo and raw React Native ecosystems.
- Build Overhead: Ejected projects lose Expo’s fully managed build process, requiring manual Xcode/Android Studio configurations.
- Dependency Management: Ensuring Expo modules and native libraries coexist without conflicts can be tricky.
- Learning Curve: Developers must learn native code (Swift/Kotlin) and React Native bridging for custom modules.
- Use Cases:
- Building cross-platform apps with standard features (e.g., camera, maps) via Expo and custom native modules (e.g., payment gateways, IoT integrations).
- Prototyping MVPs with Expo, then adding advanced features like AR/VR or hardware access with raw React Native.
- Developing enterprise apps requiring both rapid deployment and specific native integrations.
- InApps Technology’s Role:
- Offers expertise in Expo and raw React Native development, seamlessly integrating both for hybrid workflows.
- Leverages Vietnam’s 200,000+ IT professionals, providing cost-effective rates ($20-$50/hour) for high-quality mobile apps.
- Supports Agile methodologies with tools like Jira, Slack, and Zoom for efficient collaboration (GMT+7).
- Recommendations:
- Start with Expo for rapid development, ejecting only when native features are required.
- Use expo-dev-client to test custom native code within Expo’s ecosystem.
- Document native module integrations to simplify maintenance and onboarding.
- Partner with InApps Technology for expert hybrid app development, leveraging Vietnam’s skilled developers to deliver cost-effective, scalable solutions.
Overview
Expo-starter-kit is a powerful, minimal configuration scaffolding tool, which provides a basic configuration for ejected apps built with expo, saving the developers from the hassle of manually ejecting apps. expo-starter-kit exposes an easy-to-use scripts’ list for handling builds, running an app in ejected as well as in unejected mode.
Features
Some of the features which make this module a boon for developers is-
- Minimal configuration
- Blazing fast development
- Rich script structure to run the app in ejected or unejected mode, with the help of just one command
- Do whatever you want in the Xcode and Android Studio projects
- Support for third-party native modules for React Native, non-Expo-specific instructions such as react-native link
- distribute your app as an ipa or apk without pain
Why should I eject my expo app?
And the answer is pretty simple. “Ejecting” is the process of setting up your own custom builds for your CRNA app. It can be necessary to do if you have needs that aren’t covered by CRNA or expo. Apps built with React-native are written in javascript, offering a bridge between writing old school platform-specific apps using kotlin, swift, etc. And this is the specialty offered by react-native, which makes it blazing fast and powerful to use.
However, there are some cases where advanced developers need native capabilities outside of what Expo offers out-of-the-box.
The most common situation is when a project requires a specific Native Module which is not supported by React Native Core or the Expo
SDK.
You might want to eject in the following cases:-
- If you do need to eject to build your own distribution package or to include your own native code
- If you wish to distribute your app to coworkers, friends, or customers. Right now you can do so by either making use of a service to host or build your CRNA app or by ejecting.
- If you wish to use a functionality that comes from interfacing directly with mobile platform APIs via Java, Objective-C, Swift, C, etc. As of right now, the only way to get direct access to these APIs from your app is by “ejecting” from CRNA and building the native code yourself.
Why is this module so special?
When building large, complex native apps using technologies like react-native or ionic, a programmer eventually feels the need for ejecting the application due to the reasons mentioned above and it is a universal truth that ejecting is a painful process.
Also, there might be some cases when a customer might force the programmer to use a native library, which expo or react-native might not offer out-of-the-box. These integrations require the use of react-native link which can only function in the ejected version of the app.
Therefore, this module is made as a headstart for running your app in ejected or unjected mode using simple, and easy to use commands.
Having said enough, let’s get into some real action-packed coding.
Getting Started
NOTE: The instructions below are written specifically for mac. Running Android version of windows should be pretty similar.
Setting up for an iOS device/simulator
Install the following module. Note it is npx (not npm)
npx create-expo-native-app
Install the dependencies.
npm install
Installation
Run the init script to specify your application name. It’s gonna prompt you for your app name and a slug name
npm run init

This package uses bundler as a dependency so let’s go ahead and install it through gem.
gem install bundler
Install the required native dependency files
npm run install-ios-libs

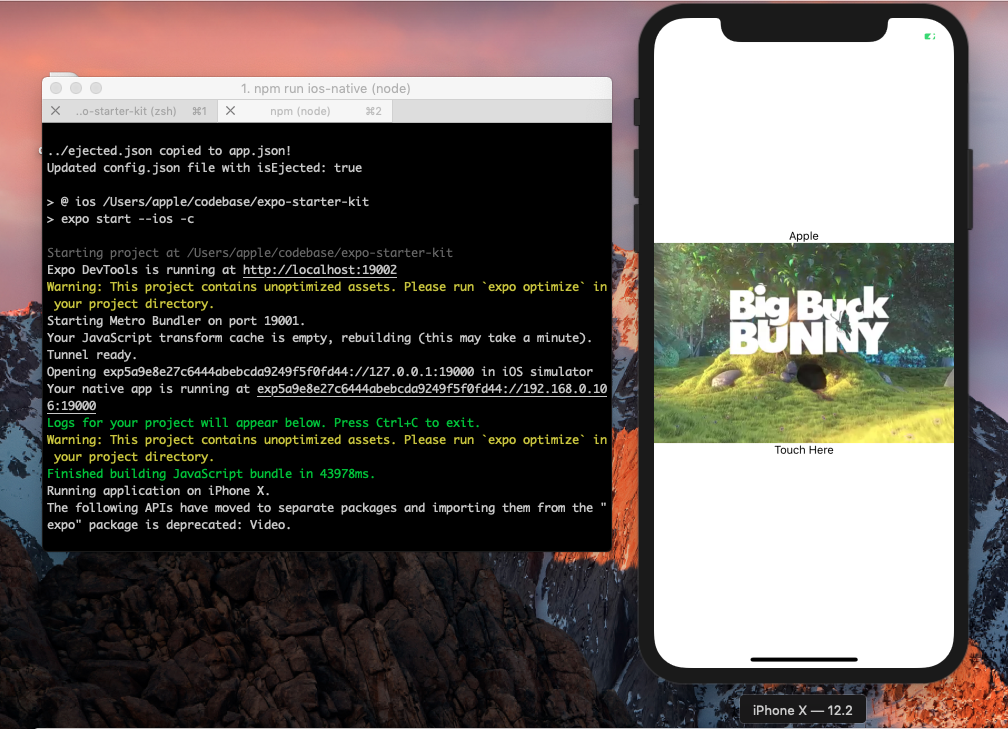
Cool! We’re good to go. Let’s run the app now. But make sure you have command 5 running in a separate terminal (depending upon whether you want to run the ejected or the unejected version).
react-native run-ios

BOOM, we’re up and running. Great job. Let’s come to the cool part. Try starting the app in ejected mode with this simple command
Did you notice that a small icon appeared at your ios simulator, rather than starting the app through expo? You’re right! You just successfully ran the ejected version of your app.
npm run ios-native

That’s not it, now try running the app in unejected mode.
npm run ios-expo

Setting up for an android device/simulator
Having things done for iOS device users, let’s make lie easier for android device users as well.
Follow steps 1 and 2, the same you did for iOS devices.
Installation
Run the init script to specify your application name. It’s gonna prompt you for your app name and a slug name
npm run init
Run this gradlew command in the android folder of your app (Make sure you have an AVD android simulator set up and running before running this command)
cd android && ./gradlew installDebug

Open the android folder of your app in android studio, and hit the run button. This will sync and build the android version of your app.
Note:- Please install android studio v3.2.1 to avoid breaking errors.

Okay, fingers crossed! Let’s try running this in the ejected mode.
npm run android-native

5. Great job, let’s run it in the unejected mode as well.
npm run android-expo
Allow permit for drawing over other apps in the android device/ simulator and we’re good to go.

Phew! that was a long one. But fun isn’t it? Now you can go ahead and start building your app. Let’s move further.
How to add a native module into expo kit
Let’s start by building a mock file to mock a native module, which we might want to use other than the ones provided by the expo, and would have to eject our app in order to use it.
As an example, let’s try integrating “react-native-device-info“ into our app, which requires ejection from expo.
npm install react-native-device-info
And run the application in the unejected mode –
npm run ios-expo
And we’re greeted by this error… :/


Using the module in the unejected and ejected version of the app
No issues! Let’s try and fix this up.
Let’s start by creating a mock module file, mocks/DeviceInfoMock.js, to simulate the behavior of an external non-linked module –
export default class DeviceInfoMock {
    static getBrand() {
        return "expo dummy device"
    }
}
Next, set up your “babel.config.js“ file to set up an alias, so that it reads from the provided path –
const config = require('./config.json');
module.exports = function(api) {
  api.cache(true);
  const babelConfig = {
    presets: ['babel-preset-expo'],
    plugins: [
      [
        "module-resolver",
        {
          // "root": ["./assets"],
          alias: {

          },
          extensions: [".ios.js", ".android.js", ".js", ".json"],
        },

      ],
    ],
  };

  if(!config.isEjected) {
    babelConfig.plugins[0][1].alias['react-native-device-info$'] = './mocks/DeviceInfoMock';
  }
  return babelConfig
};
Let’s have a look at how have we used this module,
import React from 'react';
import {Video} from 'expo';
import {StyleSheet, Text, View, TouchableHighlight, Dimensions, TouchableOpacity} from 'react-native';
import {dismissModal, Modal, showModal} from 'expo-modal';
import DeviceInfo from 'react-native-device-info';

const {height, width} = Dimensions.get('window');

export default class App extends React.Component {

  render() {

    const innerComponent = <View style={{height: height/2 , width: width, justifyContent: 'center', alignItems: 'center'}}>
      <Text>Hello world</Text>
      <TouchableOpacity onPress={() => dismissModal()} ><Text>close modal</Text></TouchableOpacity>
    </View>

    return (
        <View style={styles.container}>
          <Modal/>

          <Text>{DeviceInfo.getBrand()}</Text>
          <Video
              source={{uri: 'http://d23dyxeqlo5psv.cloudfront.net/big_buck_bunny.mp4'}}
              shouldPlay={true}
              resizeMode="cover"
              style={styles.videoPlayer}
          />
          <TouchableHighlight
              onPress={() => {showModal(innerComponent)}}
          >
            <Text> Touch Here </Text>
          </TouchableHighlight>
        </View>
    );
  }
}

const styles = StyleSheet.create({
  container: {
    flex: 1,
    backgroundColor: '#fff',
    alignItems: 'center',
    justifyContent: 'center',
  },
  videoPlayer: {
    position: 'relative',
    width: '100%',
    aspectRatio:3/2,
  },
});
So according to our logic, if the app is not ejected then the DeviceInfo must be fetched from our mock module instead of fetching it from react-native-device-info.
Now your screen must show ‘expo dummy device’ when starting the unejected version of your app –

CONGRATS! YOU JUST INTEGRATED A MODULE IN YOUR EXPO APP.
I hope you have noted the fact that for every native module, you have to write a mock for expo. But that’s pretty simple, just see the public functions of the module that you are using and return a mock data/behavior from there. And in your “babel.config.js“ file add the following line inside the if block
babelConfig.plugins[0][1].alias['react-native-device-info$'] = './mocks/DeviceInfoMock';
Closing thoughts
So, what we have accomplished with the above starter kit?
We have created a way in which we can run both expo and raw react-native codebase together.
And what did we achieve after doing so?
- The devs who don’t need to work on the native modules will never need to touch the ios and android builds with this. They can simply keep on running expo even though the other dev is adding native modules.
- The regular problem of developers building the app in expo, then ejecting it because of some use case, and then converting the expo coded UI in react-native is gone.
We are utilizing all that native modules have to offer without letting go of the development environment that expo offers.
Need some help in building your expo app? Feel free to get in touch with us.
Let’s create the next big thing together!
Coming together is a beginning. Keeping together is progress. Working together is success.