This article will explain the concept of CI/CD, CircleCI config, and how to apply it to a practical case – NodeJS project. Even if that specific tooling concoction isn’t your cup of tea, the ideas we’ll go through will be helpful for whatever is in your setup.
Key Summary
CircleCI is a continuous integration and delivery (CI/CD) platform, allowing developers to automate the code release process.
It supports a variety of programming languages and can deploy to several cloud platforms, including AWS, Azure, and Heroku.
CircleCI is favored over Jenkins for the following reasons:
Requires no server setup as it is cloud-native, saving time and resources.
Features an updated, user-friendly interface compared to Jenkins.
Provides clear and comprehensible `.yml` syntax for configuration which supports complex pipeline execution.
The setup process includes:
Monitoring Bitbucket commits to trigger CircleCI.
Configuring a remote server for deployment via SSH.
Using caching and other optimizations for efficient pipeline handling.
The article provides a practical example involving:
A NodeJS project using Bitbucket and CircleCI.
Continuous integration processes that automate code updates, testing, and deployments.
Utilization of SSH keys for secure server communications during deployments.
CircleCI’s advantages include excellent support for Docker, workflow orchestration capabilities, SSH debugging, and comprehensive visualization through a dashboard.
What is CircleCI config?
Continuous integration (CI) is a strategy that encourages developers to integrate their work into a common repository’s master branch. Instead of developing features in isolation and merging them at the conclusion of a development cycle, each developer integrates code with the common repository numerous times.
CircleCI is a continuous integration and delivery platform that enables development teams to release code quickly while automating the build, test, and deploy processes.
CircleCI can be set to execute extremely complicated pipelines effectively using caching, docker layer caching, resource classes, and other features. After a GitHub or Bitbucket repository is approved and added as a project to circleci.com, every code prompts CircleCI to start tasks. After the test, CircleCI sends an email indicating success or failure.

CircleCI NodeJS
What is CI/CD? When to use CircleCI?
Continuous integration and continuous delivery are abbreviated as CI/CD.
Continuous Integration is the practice of automatically merging all code updates from many developers into a single common repository. Then, before each build, each integration is validated by an automated tool that checks for code style and executes tests.
Continuous Delivery complements Continuous Integration by delivering all code changes to the testing or production environment following the build step. In other words, all-new features, bug fixes, and so on will be sent to testers/users on a regular basis.
This CI/CD method greatly minimizes the cost of manual operation for developers, improving productivity and reducing deployment time.
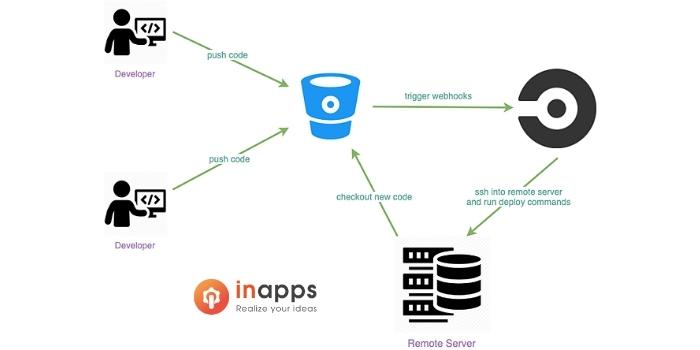
For example:
- A group of developers is working on a NodeJS project.
- Developers’ code updates are posted to a Bitbucket repository.
- CircleCI will be triggered with each commit submitted to the repository. It will download the most recent code, install dependencies, and run tests.
- After all, tests have been passed, CircleCI will deploy code to a remote server using SSH.
Why is CircleCI config better Jenkins (and other alternatives)?
Apart from many other CI/CD tools, we solely compare CircleCI to Jenkins — the most popular CI/CD tool of all time — in this post.
|
CircleCI |
Jenkins |
| The first and most obvious distinction between Jenkins and CircleCI is that you need a server to host Jenkins on, requiring administrative skills and a significant amount of effort for configuration/customization. | Meanwhile, CircleCI is a cloud-native platform, which means it does not need any server setup and can be used right away. |
| Second, the Jenkins UI is outdated and unintuitive, whereas CircleCI’s design is incredibly user-friendly. | CircleCI yml syntax is clean and easy to comprehend for developers regarding configuration. |
To summarize, CircleCI is a lightweight CI/CD platform that natively supports practically every programming language. Deployments may also be made to AWS, Azure, Google Cloud, Heroku, and various other cloud hosting platforms.
How to set up CircleCI config?
Let’s have a look at this Practical scenario: Deploy a NodeJS Project to a Remote Server
Prerequisites:
- Node.js project stored in a Bitbucket repo
- CircleCI account
- A remote server that you can connect via SSH. On this server, you must install git, Node.js, and pm2 (recommended tool to manage Node.js processes)
- Basic understanding of SSH
CircleCI tutorial
Set up:
1. Configure CircleCI to monitor Bitbucket commits.
- Create a folder called .circleci at the root of your project, and then add the config.yml file to this folder.
- Connect your Bitbucket repository to the CircleCI project.
- CircleCI can now run the build job defined in the config.yml file.
2. Set up the remote server so that CircleCI can run the deployment process.
By running the following command on the terminal, we may generate an SSH key pair that we will use throughout this tutorial:
ssh-keygen -t rsa -C “my_email@gmail.com”
It will ask you a few questions; remember to leave the pass blank (when we wrote this article, CircleCI requires an empty passphrase).
→ The results are 2 files: id_rsa (private key) and id_rsa.pub (public key).
Check the Bitbucket repo settings to see whether the CircleCI Deploy Key has been added automatically, copy id rsa.pub and put another key there.
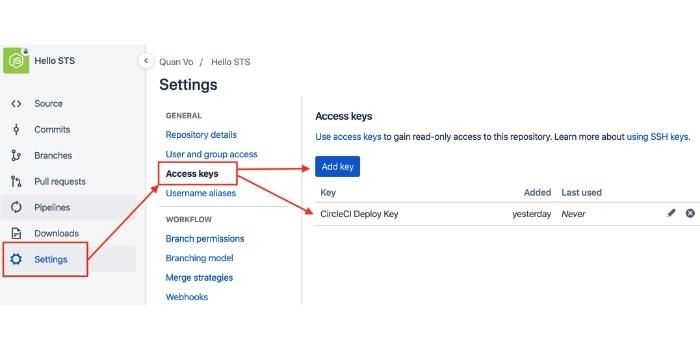
circleci requires
Copy id_rsa and add your private key there in the CircleCI project setting.
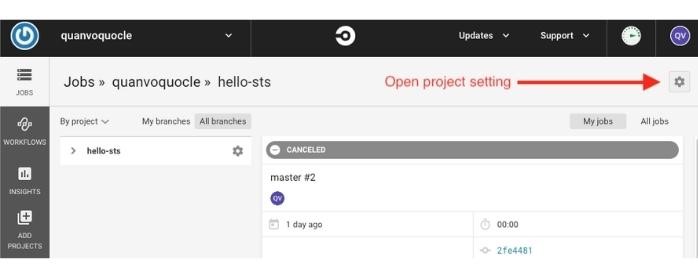
CircleCI manual trigger
In your remote server, append your public key to authorized_keys in ~/.ssh by executing this command:
cat ~/.ssh/id_rsa.pub >> ~/.ssh/authorized_keys
In your remote server, copy your private key into ~/.ssh folder and modify ~/.ssh/config file to include: CircleCI will now fetch code from Bitbucket and conduct a build operation in their cloud whenever you push code to Bitbucket. Following that, it executes a deploy job by connecting to the remote server through SSH, then automatically running the deploy command on the remote server to grab code from Bitbucket, followed by pm2 to start/restart the process stated in the config.yml file.
Host bitbucket.org
HostName bitbucket.org
IdentityFile ~/.ssh/id_rsa
Add your private key to the ssh-agent by executing this command:
eval "$(ssh-agent -s)"
ssh-add -K ~/.ssh/id_rsa
CircleCI will now fetch code from Bitbucket and conduct a build operation in their cloud whenever you push code to Bitbucket. Following that, it executes a deploy job by connecting to the remote server through SSH, then automatically running the deploy command on the remote server to grab code from Bitbucket, followed by pm2 to start/restart the process stated in the config.yml file.
ssh -p your_port_number your_user@your_host
"cd ../path/to/your/project;
git pull;
pm2 start hello_sts";
Wrapping Up
With CircleCI, you have effectively automated the development and deployment procedures. Your team may now work smoothly to produce the product on time without conducting manual activities.
This simple lesson intends to provide you with some core CircleCI information to help you get started on your DevOps journey. Dive directly into CircleCI’s docs to learn its capabilities. With so many options available for you to explore, the possibilities are limitless:
- Excellent CircleCI Docker support.
- Workflows are used to orchestrate jobs.
- SSH debugging and caching
- A visual dashboard can help you learn more about your repository.
- Deploy your application to AWS, Azure, Google Cloud, Heroku, and other cloud platforms.
If you have any concerns, feel free to fill in the contact form below to get a consultation. Or explore more services from our website.
[sociallocker id=”2721″]
List of Keywords users find our article on Google:
|
circleci bitbucket
|
|
circleci tutorial nodejs
|
|
bitbucket server
|
|
bitbucket pull request
|
| bit bucket |
|
wawa delivery
|
|
circleci with bitbucket
|
|
how to ssh into circleci
|
|
heroku continuous integration
|
|
bitbucket support
|
|
hire bitbucket developers
|
|
ssh into circleci
|
|
hire heroku developers
|
| circleci saas |
|
heroku bitbucket
|
|
pull request bitbucket
|
|
node js continuous integration
|
|
bitbucket checkout
|
|
bitbucket create branch
|
| circleci logo |
|
bitbucket pipelines deployment
|
| “ci / cd” |
|
circleci best practices
|
|
jenkins nodejs
|
|
circleci run with ssh
|
| heroku ci cd |
|
hire jenkins developers
|
|
practical ecommerce
|
|
bitbucket status
|
|
bitbucket deployment
|
| bitbucket ssh |
|
bitbucket pipelines pricing
|
|
push changes to bitbucket
|
|
bitbucket ssh key
|
|
nodejs continuous integration
|
|
bitbucket deployments
|
|
bitbucket price
|
| “ci/cd” |
| circle ci ssh |
| ci portfolio |
| circleci status |
|
status bitbucket
|
|
bitbucket cloud
|
|
merge bitbucket accounts
|
|
circleci deploy to google cloud
|
|
bitbucket apps
|
| pm2 install |
| ci cd circleci |
|
circle ci github
|
| mvp pub |
|
bitbucket create branch from commit
|
|
install bitbucket
|
|
continuous delivery node app
|
|
trustpilot alternatives
|
| bitbucket cost |
|
bitbucket account
|
|
bitbucket compare branches
|
|
what is circle ci
|
|
hire ssh developers
|
|
hire circleci developers
|
|
host integration server
|
|
bitbucket project key
|
| bitbucket icon |
|
circle ci status
|
|
bitbucket merge strategy
|
|
aws.config.update
|
|
bitbucket merge accounts
|
|
bitbucket dashboard
|
| ssh bitbucket |
|
circleci what is
|
|
jenkins configuration as code
|
| circleci aws |
|
bitbucket server ci
|
|
react-native-config
|
| bitbucket app |
|
circleci deploy to heroku
|
|
bitbucket pipelines docker
|
| bitbucket cicd |
|
bitbucket deploy
|
|
vs code bitbucket
|
|
bitbucket branching model
|
|
bitbucket add user
|
|
bitbucket download
|
|
docker circleci
|
|
bitbucket commands
|
|
add files to bitbucket repository
|
|
bitbucket add user to project
|
|
bitbucket pipelines aws
|
| circleci github |
| install pm2 |
|
bitbucket webhooks
|
| nodejs ci |
|
bitbucket copy repository
|
|
jenkins integration
|
|
“ci/cd” -“engineer”
|
| “circleci” |
| pm2 github |
| wawa jobs |
|
bitbucket data center
|
| buitbucket |
| bitbucker |
| bitbacket |
|
what is circleci used for
|
|
bitbucket compare commits
|
|
bitbucket downloads
|
|
concept 2 pm2
|
|
bitbucket merge checks
|
|
jenkins bitbucket
|
|
circleci resource class pricing
|
|
bitbucket add file online
|
|
bitbucket client
|
|
circleci node docker
|
|
bitbucket agent
|
|
bitbucket pull request template
|
|
bitbucket number of commits
|
| heroku ci |
|
bitbucket create empty branch
|
|
bitbucket azure
|
|
pull request template bitbucket
|
|
bitbucket merge
|
|
bitbucket on aws
|
|
bitbucket twitter
|
| circleci ssh |
|
google cloud nodejs
|
| circle ci |
|
bitbucket find all commits by user
|
|
bitbucket git login
|
| bitbucket pull |
|
circle ci docker
|
|
how does circleci work
|
|
docker bitbucket
|
| ssh to circleci |
|
bitbucket template repository
|
| pm2 restart |
|
merge in bitbucket
|
|
bitbucket close branch after merge
|
|
circleci alternative
|
|
download bitbucket
|
|
heroku circleci
|
|
circleci heroku
|
|
story of the world cd
|
|
create branch from specific commit bitbucket
|
|
heroku pipelines
|
|
best afternoon tea ho chi minh city
|
|
bitbucket search commit
|
|
circleci heroku deploy
|
|
circleci workflow
|
|
bitbucket see all commits by user
|
|
merge branch bitbucket
|
|
bitbucket tasks
|
|
bitbucket build
|
|
bitbucket pipelines ssh to server
|
|
bitbucket see commits by user
|
|
bitbucket circleci
|
|
bitbucket pipelines ssh
|
|
bitbucket merge branch
|
|
bitbucket merge branch to master
|
|
circleci use new ui
|
|
heroku deploy react app
|
|
bitbucket close branch
|
|
bitbucket code quality
|
|
bitbucket repository owner
|
|
ssh for bitbucket
|
|
create branch from commit id bitbucket
|
|
bitbucket find commits by user
|
|
bitbucket search commits
|
|
bitbucket search code in all repositories
|
|
circleci vs docker
|
|
how to create pull request for specific commit bitbucket
|
|
bitbucket create branch from master
|
| ci cd heroku |
|
remote nodejs jobs
|
|
bitbucket branch
|
|
bitbucket use ssh key
|
|
create branch from commit bitbucket
|
|
bitbucket create new branch
|
|
bitbucket reviews
|
|
expo react native install
|
|
cd review example
|
|
circle ci with github
|
|
react native config
|
|
bitbucket branch from commit
|
| ci/cd circleci |
|
circleci docker aws
|
|
create pull request bitbucket
|
|
git pull bitbucket
|
|
bitbucket difference between project and repository
|
|
how to check in code in bitbucket
|
|
create branch in bitbucket
|
|
react native expo sample project
|
|
bitbucket add repository to project
|
|
bitbucket group repositories
|
|
bitbucket main branch
|
|
cd cover design template
|
|
cd portfolio case
|
|
expo react native
|
| bitbucket key |
|
bitbucket new branch
|
|
bitbucket pipelines branch name
|
|
bitbucket set main branch
|
| cd restart |
|
pull request in bitbucket
|
|
bitbucket create user
|
|
bitbucket push to repository
|
|
create a branch in bitbucket
|
|
create a pull request in bitbucket
|
|
bitbucket commits by user
|
|
bitbucket create master branch
|
|
bitbucket pipelines yml
|
|
bitbucket project settings
|
|
circleci mobile
|
|
what is bitbucket
|
|
add ssh bitbucket
|
|
bitbucket create project
|
|
bitbucket pipelines deploy to server
|
|
bitbucket pipelines deploy to server ssh
|
|
ci cd react native
|
|
circleci git commit
|
|
circleci workflows
|
|
create pull request in bitbucket
|
|
heroku react deploy
|
|
upload code to bitbucket
|
|
bitbucket git pull
|
|
deploy react app to heroku
|
|
bitbucket get ssh key
|
|
bitbucket search
|
|
bitbucket share repository
|
|
continuous delivery with docker and jenkins
|
|
pm2 start command
|
|
react native expo app icon
|
|
bitbucket create repository
|
|
circleci vs jenkins
|
|
deploy node app on aws
|
|
bitbucket deploy to server
|
|
bitbucket add key
|
|
jenkins node js
|
|
bitbucket create pull request
|
|
pub ho chi minh
|
|
bitbucket jenkins webhook
|
| ci/cd news |
|
“circleci” ci or ci/cd or “ci tool”
|
|
fintech vietnam
|
|
bit bucket account
|
|
bitbucket code
|
|
www bitbucket
|
|
bitbucket data center installation
|
| bitbucket org |
| bitbukcet |
| circleci news |
| bickbuket |
| birbucket |
|
circleci ssh to server
|
|
order wawa delivery
|
| bibucket |
|
cd keys trustpilot
|
|
deployment model of bitbucket
|
|
bitbucket careers
|
|
jenkins bitbucket server
|
| ftbucket |
|
bitbucket search syntax
|
|
bitbucket deploy to azure
|
| all key cd |
|
bitbucket repository id
|
|
remote server jobs
|
|
ssh agent jenkins
|
|
circleci node images
|
| ssh job |
|
bitbucket pipelines node
|
|
circle ci bitbucket
|
|
circleci alternatives
|
|
react native circleci
|
|
linkedin login nodejs
|
|
phunware public
|
| game config |
|
remote node.js developer jobs
|
|
bitbucket docker
|
|
jenkins bitbucket integration
|
|
node js whatsapp group
|
|
bitbucket trigger
|
|
careers wawa
|
| circleci jobs |
|
hire remote docker developers
|
| circleci office |
|
bitbucket server support
|
|
jenkins ssh-agent
|
|
bitbucket icons
|
| heroku jobs |
|
bitbucket pipelines syntax
|
|
bitbucket user id
|
|
cd folder case
|
|
circleci/node images
|
| aws bitbucket |
|
bit bucket server
|
|
bitbucket server docker
|
| circle ci aws |
|
circleci github status
|
|
heroku app facebook
|
|
install bitbucket server
|
|
bitbucket update branch from master
|
|
configuration as code jenkins
|
|
how to merge code in bitbucket
|
|
test ssh bitbucket
|
|
bitbucket search for commit
|
|
circleci github release
|
|
circleci react native
|
| ssh game |
|
bit bucket pull request
|
|
bitbucket cloud status
|
|
bitbucket server update
|
|
bitbucket server vs bitbucket
|
|
deploy expo app
|
|
jenkins configuration as a code
|
|
hire bitbucket developer
|
|
hire heroku developer
|
|
how to restart pm2 process
|
|
aws sts command
|
|
bitbucket and jenkins integration
|
|
bitbucket builds
|
|
bitbucket ci cd aws
|
|
bitbucket use ssh
|
| ci tea |
|
configure pm2
|
|
create pull request for specific commit bitbucket
|
|
deploy react build to heroku
|
| jenkins core |
|
merge pull request bitbucket
|
|
react native expo install
|
|
bitbucket automation
|
|
bitbucket code review without pull request
|
|
bitbucket merge request
|
|
heroku examples
|
|
how to merge branch to master bitbucket
|
| node rsa |
|
nodejs jenkins
|
|
what is custom branch type in bitbucket
|
|
bitbucket search branch
|
|
circleci founders
|
| circleci npm |
|
git push heroku master
|
|
github checks circleci
|
|
how to commit code in bitbucket
|
|
how to commit code to bitbucket
|
| pm2 debug |
|
aws sts example
|
|
bitbucket close pull request
|
|
bitbucket heroku
|
|
circleci checks github
|
| circleci setup |
|
deploy from bitbucket
|
|
heroku deploy react app with server
|
|
how to merge in bitbucket
|
| pm2 setup |
|
bitbucket search code in all branches
|
|
bitbucket search examples
|
|
cd recruitment
|
| ci cd node js |
|
circle ci new ui
|
|
github circleci checks
|
|
how to enable two factor authentication bitbucket
|
|
how to merge branch to master in bitbucket
|
|
jenkins frontend
|
| node-rsa |
|
pull from bitbucket
|
| bit bucket ssh |
|
bitbucket release
|
|
bitbucket server version
|
| ci job name |
|
circleci with docker
|
|
deploy nodejs app to aws
|
|
deploy react js app on heroku
|
|
jenkins x alternatives
|
| nodejs jobs |
|
nodejs jobs remote
|
| пегас агент |
|
bitbucket add user to repository
|
|
bitbucket ci/cd tutorial
|
|
bitbucket create group
|
|
bitbucket run tests on pull request
|
|
bitbucket server features
|
|
circle ci heroku
|
|
circleci with github
|
|
deploy react node app to heroku
|
|
heroku deploy node react app
|
|
how to create branch in bitbucket
|
|
how to create new branch in bitbucket
|
|
jenkins copy job from another folder
|
| jenkins ssh |
|
aws docker circleci
|
|
bitbucket code deploy
|
|
bitbucket configure ssh
|
|
circleci environment
|
|
deploying node js app to aws
|
| heroku icon |
|
how to checkout from bitbucket
|
|
install expo react native
|
|
push to bitbucket
|
|
react native expo template free
|
|
add files to repository bitbucket
|
|
bitbucket merge pull request
|
|
bitbucket pipelines trigger
|
|
blank cd template
|
|
circleci new ui
|
|
deploy to heroku from circleci
|
|
github release circleci
|
|
heroku app examples
|
|
how to create a new branch in bitbucket
|
|
how to pull from bitbucket
|
| pm2 dev |
|
pm2 restart app
|
|
azure devops merge projects
|
|
bitbucket cloud support
|
|
bitbucket commit message
|
|
bitbucket how to merge pull request
|
|
bitbucket public key
|
|
bitbucket server pipelines
|
|
bitbucket set up ssh
|
|
bitbucket ssh keys
|
|
budget proposal template google docs
|
|
check bitbucket version
|
|
circleci parallel
|
| circleci server |
|
docker jenkins ssh agent
|
|
get ssh key bitbucket
|
|
how to add code to bitbucket
|
|
how to add user to bitbucket repository
|
|
how to create a branch in bitbucket
|
| jenkins x logo |
|
niche skills in software testing
|
|
react native code push
|
|
ssh to bitbucket
|
|
azure bitbucket integration
|
|
bitbucket create a pull request
|
|
bitbucket how to push code
|
|
circleci education
|
|
circleci headquarters
|
|
circleci heroku docker
|
|
circleci run workflow manually
|
|
deploy node js app to aws
|
|
deploy react js to heroku
|
|
how to commit in bitbucket
|
|
how to merge branches in bitbucket
|
|
how to push to bitbucket
|
|
react native ci cd
|
|
aws deploy nodejs
|
|
aws deploy nodejs app
|
|
bit bucket app
|
|
bitbucket cloud pipelines
|
|
bitbucket config
|
|
bitbucket push to branch
|
|
bitbucket review
|
|
bitbucket service status
|
|
bitbucket share project
|
|
bitbucket team
|
|
circleci download
|
|
circleci push to github
|
| config about |
|
create a new branch in bitbucket
|
|
deploy create react app to heroku
|
|
deploy heroku react app
|
|
deploy node and react app to heroku
|
|
deploy nodejs app on aws
|
|
deploy react heroku
|
|
how to restart pm2 service
|
|
install expo in react native project
|
| jenkins config |
|
push bitbucket
|
|
ssh key for bitbucket
|
|
upload react app to heroku
|
|
what is a pull request in bitbucket
|
| app circleci |
|
bitbucket continuous integration
|
|
bitbucket deployment environment
|
|
bitbucket how to add ssh key
|
|
bitbucket new repository
|
|
bitbucket push to master
|
|
bitbucket search code
|
| cicd full form |
|
circleci bitbucket integration
|
|
circleci parallel jobs
|
|
circleci プログラマー
|
|
create new repository bitbucket
|
|
how to deploy create react app to heroku
|
|
how to push code on bitbucket
|
|
jenkins get branch name
|
|
jenkins google cloud
|
|
node js jenkins
|
| nodejs ci cd |
|
pull request bit bucket
|
|
react app deploy heroku
|
|
share repository bitbucket
|
|
what is expo react native
|
|
add user to bitbucket repository
|
|
add user to repository bitbucket
|
|
bitbucket contact
|
|
bitbucket create branch from another branch
|
|
bitbucket how to create pull request
|
|
bitbucket monitoring
|
|
bitbucket server download
|
|
bitbucket test ssh
|
| cd on |
| circle yml |
|
circleci trigger on pull request
|
|
circleci without docker
|
|
commit to bitbucket
|
|
create a pull request bitbucket
|
|
git pull request bitbucket
|
|
how to push in bitbucket
|
| learn circleci |
|
pm2 start with name
|
|
pull requests bitbucket
|
|
react native ci
|
|
teams bitbucket
|
|
approval circleci
|
|
bitbucket copy repository to another repository
|
|
bitbucket how to create a branch
|
|
bitbucket merge branch to another branch
|
|
bitbucket pipelines deployment environments
|
|
bitbucket rsa key
|
| cicd circle ci |
|
circle ci config
|
|
circleci approve
|
|
circleci-workflows
|
|
create new branch in bitbucket
|
|
deploy node react app to heroku
|
|
deploy react and node to heroku
|
|
deploy react project to heroku
|
|
docker bitbucket pipelines
|
| github circleci |
|
heroku circle ci
|
|
how to add ssh key to bitbucket
|
|
how to automate bitbucket
|
|
how to get commit hash in bitbucket
|
|
how to push bitbucket
|
|
jenkins remote trigger
|
|
push code to bitbucket repository
|
|
ssh-keygen bitbucket
|
|
what does circleci do
|
|
azure mobile app example
|
|
bitbucket add project to repository
|
|
bitbucket consulting
|
|
bitbucket leave repository
|
|
bitbucket private key
|
|
bitbucket pull request status
|
|
bitbucket ssh git
|
|
bitbucket ssh keygen
|
| cd cat food |
|
ci cd bitbucket
|
|
ci cd for react native
|
|
circleci and github
|
|
circleci aws integration
|
|
circleci parallelism
|
|
circleci run job manually
|
|
circleci trigger workflow
|
|
configure ssh bitbucket
|
|
create branch bitbucket
|
|
create project in bitbucket
|
|
deploy a react app on heroku
|
|
deploy node js application on aws
|
|
deploy react app heroku
|
|
docker ci cd tutorial
|
|
how to create a new repository in bitbucket
|
| jenkins js |
|
jenkins webhooks
|
|
nodejs remote jobs
|
|
aws node js deployment
|
|
bitbucket add code to new repository
|
|
bitbucket merge branches
|
|
bitbucket ssh add
|
|
bitbucket status page
|
|
bitbucket-pipelines.yml
|
|
circleci deploy to aws
|
|
circleci images
|
|
circleci run parallel
|
|
create project bitbucket
|
|
deploy backend to heroku
|
|
deploy react app with heroku
|
|
deploy react in heroku
|
| food caching |
|
git ssh bitbucket
|
|
heroku setup nodejs
|
|
hire jenkins developer
|
|
host react on heroku
|
|
how to commit to bitbucket
|
|
how to create pull request bitbucket
|
|
how to upload code to bitbucket
|
|
install react native expo
|
|
jenkins deploy to remote server
|
|
ssh key bitbucket
|
|
add users to bitbucket
|
|
bit bucket repository
|
|
bitbucket add ssh
|
|
bitbucket checkout branch
|
|
bitbucket cloud account
|
|
bitbucket username example
|
|
circleci founder
|
|
circleci gcloud
|
|
continuous integration node js
|
|
create new branch bitbucket
|
|
heroku continuous deployment
|
|
heroku integration
|
|
how to add circleci to github
|
|
how to deploy react app to heroku
|
|
how to pull code from bitbucket
|
| netsetup |
|
pull code from bitbucket
|
|
search bitbucket
|
|
add key to bitbucket
|
|
add project to bitbucket repository
|
|
azure devops alternatives
|
|
bitbucket create team
|
|
bitbucket deploy to server ssh
|
|
bitbucket pipelines docs
|
|
bitbucket project vs repository
|
|
bitbucket user list
|
|
circleci github pages
|
|
circleci google cloud
|
|
circleci run jobs in parallel
|
|
circleci run tests in parallel
|
|
create repository bitbucket
|
| dedicated cd |
|
deploy nodejs app aws
|
|
deploy react app in heroku
|
|
deploy react app on heroku
|
| dna cd |
|
docker jenkins agent
|
|
heroku git pull
|
|
how to deploy react to heroku
|
|
jenkins deploy to heroku
|
|
react heroku deploy
|
|
bitbucket add user to team
|
|
bitbucket create repository in project
|
|
deployment bitbucket pipelines
|
|
heroku jenkins
|
| jenkins azure |
|
pull develop into feature branch
|
|
push project to bitbucket
|
| remote config |
|
ssh key in bitbucket
|
|
bitbucket health
|
|
ci/cd with docker
|
|
monitor jenkins
|
|
this folder is empty
|
|
ci/cd workflow
|
|
ci/cd platforms
|
|
ssh monitoring
|
|
ci/cd pipeline tools
|
|
node integration
|
[/sociallocker]
Let’s create the next big thing together!
Coming together is a beginning. Keeping together is progress. Working together is success.