- Home
- >
- Mobile apps development
- >
- The complete guide for Python and Django-Part1 Python

The complete guide for Python and Django-Part1 Python – is an article many of you are most interested in today !! Today, let’s InApps.net learn The complete guide for Python and Django-Part1 Python – in today’s post !
Key Summary
- Overview: The 2022 article by InApps Technology serves as Part 1 of a comprehensive guide, focusing on Python’s fundamentals, its advantages, and its role as the foundation for the Django framework, aimed at developers seeking to build robust web applications.
- What is Python?:
- Definition: An open-source, high-level, interpreted programming language known for its readability, simplicity, and versatility.
- Key Characteristics:
- Dynamic Typing: No need to declare variable types, enhancing coding flexibility.
- Object-Oriented and Functional: Supports multiple programming paradigms, including OOP (classes, objects) and functional programming (lambda functions).
- Interpreted: Executes code line-by-line, facilitating debugging and rapid prototyping.
- Extensive Libraries: Offers a vast standard library and third-party packages (e.g., NumPy, Pandas) for diverse applications.
- Use Cases: Web development (Django, Flask), data science (machine learning, data analysis), automation, AI, and scripting.
- Why Use Python?:
- Readability: Clean, English-like syntax reduces the learning curve and improves maintainability.
- Example: print(“Hello, World!”) is intuitive compared to lower-level languages.
- Versatility: Applicable across domains, from web apps to AI, due to its extensive ecosystem.
- Community Support: Large global community, active on platforms like GitHub, with abundant tutorials and packages.
- Cross-Platform: Runs on Windows, macOS, Linux, enabling portable development.
- Productivity: High-level abstractions and libraries speed up development, ideal for startups and MVPs.
- Readability: Clean, English-like syntax reduces the learning curve and improves maintainability.
- Python in Web Development:
- Python is a leading choice for web development due to frameworks like Django and Flask.
- Advantages:
- Rapid development with pre-built modules and frameworks.
- Strong security features (e.g., Django’s built-in protections against SQL injection, XSS).
- Scalability for large-scale apps (e.g., Instagram, Pinterest run on Django).
- Popular Frameworks:
- Django: Full-stack framework for rapid, secure, and scalable web apps.
- Flask: Lightweight, flexible framework for smaller or custom projects.
- Introduction to Django:
- Definition: A high-level, open-source Python web framework following the Model-View-Template (MVT) architecture, designed for rapid development and clean, pragmatic design.
- Key Features:
- ORM (Object-Relational Mapping): Simplifies database interactions using Python objects (e.g., Model.objects.all()).
- Admin Interface: Auto-generated, customizable dashboard for managing app data.
- Security: Built-in protections against common vulnerabilities (e.g., CSRF, SQL injection).
- Scalability: Handles high traffic, as seen in apps like Instagram and Disqus.
- DRY Principle: Encourages “Don’t Repeat Yourself” for efficient, reusable code.
- Use Case Example: Building a blog with Django involves defining models (e.g., Post, Comment), creating views for logic, and rendering templates for the frontend.
- Getting Started with Python:
- Installation:
- Download Python from python.org (e.g., Python 3.9 in 2021) and verify with python –version.
- Use package managers like pip for installing libraries (e.g., pip install django).
- Basic Syntax:
- Variables: x = 5 (no type declaration needed).
- Installation:
Functions:
def greet(name):
return f”Hello, {name}!”
- Lists: fruits = [“apple”, “banana”, “cherry”].
Loops:
for fruit in fruits:
print(fruit)
- Development Environment:
- Use IDEs like PyCharm, VS Code, or Jupyter Notebook for coding and debugging.
- Virtual environments (python -m venv env) isolate project dependencies.
- Benefits:
- Rapid Development: Python’s simplicity and Django’s features accelerate web app creation.
- Cost Efficiency: Offshore development in Vietnam ($20-$50/hour via InApps Technology) saves 20-40% compared to U.S./EU rates ($80-$150/hour).
- Scalability: Python/Django supports growth from MVPs to enterprise-level apps.
- Community and Resources: Extensive documentation and libraries reduce development hurdles.
- Challenges:
- Performance: Python’s interpreted nature may be slower than compiled languages like Java, though optimizations (e.g., caching, async) mitigate this.
- Learning Curve: Django’s conventions (e.g., MVT, ORM) require initial learning for beginners.
- Dependency Management: Managing library versions in large projects can be complex without virtual environments.
- Use Cases:
- Building scalable web apps like e-commerce platforms or social networks (e.g., Instagram).
- Developing data-driven apps with Python’s ML libraries (e.g., TensorFlow) and Django’s frontend.
- Creating rapid prototypes or MVPs for startups using Django’s admin and ORM.
- InApps Technology’s Role:
- Offers expertise in Python and Django development, delivering secure, scalable web applications.
- Leverages Vietnam’s 200,000+ IT professionals, providing cost-effective rates ($20-$50/hour) for high-quality projects.
- Supports Agile workflows with tools like Jira, Slack, and Zoom for transparent collaboration (GMT+7).
- Recommendations:
- Start with Python basics (syntax, data structures) before diving into Django for web development.
- Use Django for projects requiring rapid development, security, and scalability.
- Set up virtual environments to manage dependencies and ensure project consistency.
- Partner with InApps Technology for expert Python/Django development, leveraging Vietnam’s skilled developers for cost-effective, high-performance solutions.
Read more about The complete guide for Python and Django-Part1 Python – at Wikipedia
You can find content about The complete guide for Python and Django-Part1 Python – from the Wikipedia website
Note: In this tutorial, we will be using Python3 instead of Python2. The reason for this choice is that Python2 is slowly getting deprecated from the development world and the developers are developing new libraries strictly for the use with Python3.
Starting with Python3
Content:
- Installation
- DataTypes
- Comparison operators
- Control flow:
- IF ELIF and ELSE statements
- WHILE
- FOR loop statements
- Functions
- Object-Oriented Programming
- Installations:
Mac installation: https://docs.python-guide.org/starting/install3/osx/
Linux Installation: https://docs.python-guide.org/starting/install3/linux/
Windows Installation: https://docs.python.org/3/using/windows.html#installation-steps
In Python 3, there is effectively no limit to how long an integer value can be. Of course, it is constrained by the amount of memory your system has, as are all things, but beyond that an integer can be as long as you need it to be:
a = 123123123123123123123123123123123123123Notice that we don’t have to specify the type of the variable ‘a’ in the above code. type of the variable will be dynamically handled by python on the basis of the value being stored in the variable.
Floating Point:
The float type in Python designates a floating-point number. float values are specified with a decimal point. Optionally, the character e or E followed by a positive or negative integer may be appended to specific scientific notation:
a=2.513
print( type(a) )
In the above code, the last line will print ‘float’ , which is the type of variable ‘a’.
Complex:
We need to import “cmath” to use this data type.
Let us look at the code below and try to understand how it works.
#importing cmath
import cmath

#initialising the variable 'z' with the value '2+3i'
z=complex(2,3)

#accessing the real part of variable 'z'
print("real part of z is: " + ,end="")
print(z.real)

#accessing the imag part of 'z'
print("imaginary part of z is: " + ,end="")
print(z.imag)
Sets:
Sets represent the mathematical notion of sets. Sets are mutable, iterable and don’t have any duplicate value. Python provides us, along with ‘set’ datatype, the mathematical functions associated with the sets such as intersection, union, difference, etc.
Let us look at the following code to understand the sets better.
#creating a set 'mySet' with values 1, 2 , and 3
mySet = set([1, 2, 3])

# Adding an element to mySet by the function 'add()'
mySet.add(6)

print("mySet")
print(mySet)

#creating another set with the name 'anotherSet'
anotherSet = set([3,4,5])


union_of_sets = mySet.union(anotherSet)

#this will print {1, 2, 3, 4 ,5 ,6}
print(union_of_sets)

intersection_of_sets = mySet.intersect(anotherSet)

#this will print the set {3}
print(intersection_of_sets)

difference_of_two_sets = mySet.difference(anotherSet)

#this will print {1, 2 , 6}
print(difference_of_sets)
Dictionary:
In Python, a Dictionary can be created by placing a sequence of elements within curly {} braces, separated by ‘comma’. Dictionary holds a pair of values, one being the Key and the other corresponding pair element being its Key:value. Values in a dictionary can be of any datatype and can be duplicated, whereas keys can’t be repeated and must be immutable.
# Creating an empty Dictionary
Dict = {}
print("Empty Dictionary: ")
print(Dict)

# Adding elements into the dictionary
Dict[2] = 'alpha'
Dict[3] = 1

#this will print { 2: 'alpha'  , 3: 1}
print(Dict)

# Updating existing Key's Value
Dict[2] = 'Welcome'

the following line will print { 2: 'welcome'  , 3: 1}
print(Dict)

# Adding Nested Key value to Dictionary
Dict[5] = {'Nested' :{'1' : 'Life', '2' : 'Geeks'}}
print("nAdding a Nested Key: ")
print(Dict)
List:
A list is created by placing all the items (elements) inside a square bracket [ ], separated by commas.
It can have any number of items and they may be of different types (integer, float, string etc).
# creating a empty list
my_list = []


my_list = [1, 2, 3]

#overwriting the privious list [1 , 2 ,3 ] with the new list [1,"Hello",3.4]
my_list = [1, "Hello", 3.4]

#adding values to the list
my_list.append(5)

#now the new list is [1,"Hello",3.4, 5]
print (my_list)

my_list = ['a','b','c','d','e']

# Output: e
print(my_list[-1])

# Output: a
print(my_list[-5])
Negative indexing:
Tuple:
A tuple in Python is similar to a list. The difference between the two is that we cannot change the elements of a tuple once it is assigned whereas, in a list, elements can be changed. In other words, tuples are immutable.
A tuple is created by placing all the items (elements) inside parentheses(), separated by commas. The parentheses are optional, however, it is a good practice to use them.
A tuple can have any number of items and they may be of different types (integer, float, list, string, etc.). Let us look at the following code to understand tuples in a better way:
# Empty tuple
myTuple = ()
print(myTuple)  # Output: ()

# Tuple having integers
myTuple = (1, 2, 3)
print(myTuple)  # Output: (1, 2, 3)

# tuple with mixed datatypes
myTuple = (1, "Hello", 3.4)
print(myTuple)  # Output: (1, "Hello", 3.4)

# nested tuple
myTuple = ("mouse", [8, 4, 6], (1, 2, 3))

# Output: ("mouse", [8, 4, 6], (1, 2, 3))
print(myTuple)
A tuple can also be created without using parentheses. This is known as tuple packing. For instance:
my_tuple = "Hello", 1.2, 6
print(my_tuple)   # Output: "hello", 1.2, 6
Tuple unpacking is also possible
my_tuple = "Hello", 1.2, 6
# unpacking the tuple
a, b, c = my_tuple
print(a) # 3
print(b) # 4.6
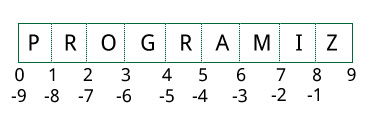
print(c) # dog Strings:
Strings are arrays of bytes representing Unicode characters. However, Python does not have a character data type, a single character is simply a string with a length of 1. Square brackets can be used to access elements of the string.
Slicing in a string:
String1 = "PythonIsFun"

print(String1)

# Printing 3rd to 12th character  using slicing
print("nSlicing characters from 3-12: ")
print(String1[3:12])

# Printing characters between
# 3rd and 2nd last character
print("nSlicing characters between " +
    "3rd and 2nd last character: ")
print(String1[3:-2])
Boolean
The bool() method is used to return or convert a value to a Boolean value i.e., True or False, using the standard truth testing procedure.
x=1
y=2
z=bool(x==y) #this statement will assign False to z as x is not equal to y

x=True
print( bool(x)) #this statement will print 'True' as x is true

x=None
print( bool(x)) #this statement will print 'False' as x is None

x={}
print( bool(x)) #this statement will print 'False' as x is None
#using bool() to find if the number is less than 5 or not
num=7
if(bool(num<5)):
print('num is less than 5')
else:
print('num is not less than 5')3. Comparison Operator/Relational Operators
Comparison operators are used to compare the two values and establish a relationship between them. The expression always evaluates to True or False.
These are the following types of comparison operators used in Python3:
- == (equal to)
- != (not equal to)
- < (less than)
- > (greater than)
- >= (greater than or equal to)
- <= (less than or equal to)
a = 21
b = 10

# '==' operator
if ( a == b ):
   print ("a is equal to b")
else:
   print ("a is not equal to b")

# '!=' operator
if ( a != b ):
   print ("a is not equal to b")
else:
   print ("a is equal to b")

# '<' operator
if ( a < b ):
   print ("a is less than b" )
else:
   print ("a is not less than b")

# '>' operator
if ( a > b ):
   print ("a is greater than b")
else:
   print ("a is not greater than b")


#swapping of values
a,b = b,a

# '<=' operator
if ( a <= b ):
   print ("a is either less than or equal to  b")
else:
   print ("a is neither less than nor equal to  b")

# '>=' opeartor
if ( b >= a ):
   print ("b is either greater than  or equal to b")
else:
   print ("b is neither greater than  nor equal to b")
4. Control Flow
(a) IF ELIF ELSE
Syntax:
if expression:
   statement(s)
elif expression:
   statement(s)
else:
   statement(s)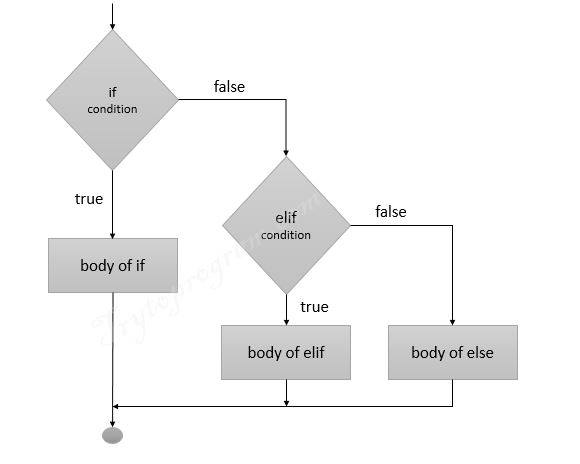
We can add as many elif as we want in-between if and else block. The count of elif blocks can also be zero. In that case, the else block will immediately follow the if block.
The following code illustrates the use of if elif and else
amount = int(input("Enter amount: "))

if amount<1000:
   discount = amount*0.05
   print ("Discount",discount)
elif amount<5000:
   discount = amount*0.10
   print ("Discount",discount)
else:
   discount = amount*0.15
   print ("Discount",discount)

print ("Net payable:",amount-discount)
Output:
Enter amount: 3000
Discount 300.0
Net payable: 2700.0
(b) WHILE LOOP
In Python, while loops are constructed like so:
while [a condition is True]:
    [do something]
The something that is being done will continue to be executed until the condition that is being assessed is no longer true.
Here is the code to illustrate the use of a while loop:
count = 0
while (count < 3):
    print(count)
    count = count + 1
Output:
0
1
2
(c) FOR LOOP
Syntax:
for iterator_var in sequence:
    statements(s)
Let us look at the following code to see understand the for loop better:
s = "HelloWorld"
for i in s :
    print(i)
Output:
H
e
l
l
o
W
o
r
l
d
Here is another piece of code to traverse the dictionary
print("nDictionary traversal")
d = dict()
d['first'] = 100
d['second'] = 200
for i in d :
    print("%s  %d" %(i, d[i]))
Output:
first  100
second  200
5. Functions
A function is a block of organized, reusable code that is used to perform a single, related action. Functions provide better modularity for your application and a high degree of code reusing.
Here is a syntax to declare a function:
def function_name( parameters ):
   #some statements
   return [expression] #the return statement is optional
For example, let us create a simple function which computes the sum of two values which are passed to it (as a parameter). We will name that function ‘sum’.
def sum(x , y):
    ans=x+y
    return ans
Calling the defined function
We can call the defined function, like the above , as follows:
result = sum(4, 5) # the function 'sum' will return 9 which will be stored in
                   # the variable 'result'
print(result)      # this statement will print '9'
Output:
96. Object-Oriented Programming / OOP
To understand OOP, we need to understand what is class and object.
Classes are like a blueprint or a prototype that you can define to use to create object.
We define classes by using the class keyword, similar to how we define functions by using the def keyword.
Learn about advantages of python over other leading languages
Syntax:
class Class_name:
    # statements to define data members and methods of this class
Let us create an empty class ‘Person’ for now.
class Person():
    pass
Important terms related to Class:
- The Constructor Method: This is the method that executes first when we create a new instance of that class. We always have to name this function as ‘__init__‘.
class Person():
    def __init__(self):
print('This is the constructor method')- Self: The argument to the __intit__ () functions is the keyword ‘
self‘, which is a reference to objects that are made based on this class. To reference instances (or objects) of the class,selfwill always be the first parameter, but it need not be the only one.
- Methods: Method is a special kind of function that is defined within a class. A class can have any number of methods. __init__() is also one of the methods.
- Attributes: Attributes are data stored inside a class or instance and represent the state or quality of the class or instance. In short, attributes store information about the instance.
Let us add two attributes ‘name’ and ‘age’ to our class ‘Person’. We can do that using the __init__() function. Here is the code:
class Person():
    def __init__(self, name , age):
        self.name=name
        self.age=age
Now, as the __init__() function is receiving ‘name’ and ‘age’ attribute, it becomes compulsory to pass the name and age while creating the instance /object ‘Person’ object. This is how we can create an object of class Person
#Creating the Person 'p' with the name 'Susan' and age 22
p=Person('Susan' , 22)
print(p.name)
print(p.age)
As we can notice from the above code, we can access the attributes associated with the object using the . operator.
Let us now add a method to our class ‘Person’ which increments the age of that person by one.
We will call that method ‘IncreaseAge()’.
class Person():
    def __init__(self, name , age):
        self.name=name
        self.age=age
    def IncrementAge(self ):
        self.age= self.age+1;

p=Person('Susan' , 22)
print('The age before calling the method IncrementAge')
print(p.age)

print('The age after calling the method IncrementAge')
p.IncrementAge();
print(p.age)
Output:
The age before calling the method IncrementAge
22
The age after calling the method IncrementAge
23
Inheritance in classes
Inheritance is one of the mechanisms to achieve the same. In inheritance, a class (usually called superclass or Base Class) is inherited by another class (usually called subclass or Derived Class). The subclass adds some attributes to a superclass.
Let us understand it by extending our Person class by creating a Student class. A student is also a person with a name and the age but also has some additional properties such as roll number.
So basically, the Student class will inherit the ‘name’ and ‘age’ attribute from its base class which is Person.
This is the code to illustrate the concept of inheritance:
class Person():
    def __init__(self, name , age):
        self.name=name
        self.age=age
    def IncrementAge(self ):
        self.age= self.age+1;


#the Student class inherits the Person class
class Student(Person):
    def __init__(self,name , age ,RollNo ):
        Person.__init__(self , name , age)
        self.rollNumber= RollNo


print("student's information")

s=Student('Madara' , 10 , 123)
print(s.rollNumber)
print(s.name)
print(s.age)
s.IncrementAge()
print(s.age)
Output:
student's information
123
Madara
10
11
Notice that, the Student class has acquired the ‘name’ and ‘age’ property from the Person class. The ‘IncrementAge()‘ method can also be used with the Student object.
Part 2 of this article will be published soon.
Source: InApps.net
Let’s create the next big thing together!
Coming together is a beginning. Keeping together is progress. Working together is success.